What equipment is necessary to set up a complete home studio?
Recording at home is now easier than ever thanks to the numerous products, audio interfaces, and other microphones available on the market.
The problem is the number of options.
Should I buy this sound card or this one? Does this microphone do the job?
When it comes time to choose, especially when you are a beginner and/or on a limited budget, you can quickly feel stuck — with the ever-present risk of buying something that won’t be useful or that is incomplete.
Or worse, something that is not of the expected quality (especially if you want to set up a budget-friendly home studio).
I remember the first time I wanted to build a mini-studio at home, I went to a store to buy my studio equipment.
I bought two things: a Shure headset and a mixing table that could be connected via USB.
Today, I still have them at home — but both are in the attic: the headset was anything but suitable for mixing (literally no bass), and the mixing table was not really effective or suitable for the use I wanted to make of it.
So how do you set up your home studio?
To help you avoid making the same mistakes and buying things you would be disappointed with, I decided to write this home studio equipment guide that should, I hope, assist you in your search.
Feel free to follow the various links in the article: they will lead you to more detailed resources regarding each type of equipment needed in a home studio.
What budget to set up a home studio?
One of the first questions that any beginner asks is undoubtedly:
How much should you invest in a home studio? What does it cost, concretely?
The answer depends on many factors: your needs, your level of expectation, and your maximum available budget.
Indeed, a complete high-end home studio setup can certainly cost a lot… but rest assured: today, it is entirely possible to do great things with a reduced budget and minimal studio equipment.
The essentials to consider
A home studio can cost from a few hundred to several thousand euros. Here are the basic elements with price ranges:
(We will detail each type of equipment a bit further on, with suitable recommendations)
- A computer: If you already have one, that’s a good starting point. Otherwise, expect to spend €800 to €2000 for a machine suitable for music production.
- A DAW (Digital Audio Workstation): Some DAWs are free, but since they often come with certain constraints, most home studio users lean towards professional solutions. Budget €100 to €500.
- An audio interface: To record and connect your speakers, prices range from €100 to €800 depending on quality.
- A headset or speakers: A good headset costs €100 to €300, and monitoring speakers €300 to €2000 per pair.
- A microphone: If you are recording vocals or acoustic instruments, a decent microphone costs €100 to €400.
- Various accessories: Microphone stands, cables, pop filters… budget €50 to €200 depending on your needs.
A price range for home studio equipment
Of course, since each situation is a bit unique (a person who produces electronic music solely on their computer will need less equipment than someone recording a drum set, for example), it is difficult to give a precise price.
However, to give you a rough idea of the budget, based on what we’ve just discussed and for classic home studio setups:
- Ultra-budget home studio: ~ 300 – 500€ (Headphones + interface + entry-level microphone, to create a cheap home studio…)
- Serious home studio: ~ 800 – 1500€ (Quality interface, speakers, good microphone…)
- Advanced home studio: 2000€ and above (Optimized setup with high-end equipment)
Note that it is possible to go for an even lower budget by really minimizing the quality of the interface or other equipment, but keep in mind that it can also be disappointing: if your audio interface costs 30€, but the recordings are poor, you will quickly abandon the adventure…
Do you absolutely need expensive equipment?
Not necessarily! The important thing is to have equipment suited to your needs. Many artists and producers started with modest equipment and evolved over time.
Some tips to optimize your budget:
✅ Prioritize quality on essential elements: A good audio interface and a reliable pair of headphones will make a real difference from the start.
✅ Avoid “cheap” at all costs: It’s better to invest in a decent 100€ interface than in a 30€ unusable model.
✅ Progressively upgrade: You are not obliged to buy everything at once. Start with the essentials and add equipment gradually.
🎯 The tip to remember: It’s not just the equipment that makes the music, but the experience and creativity you develop with it.
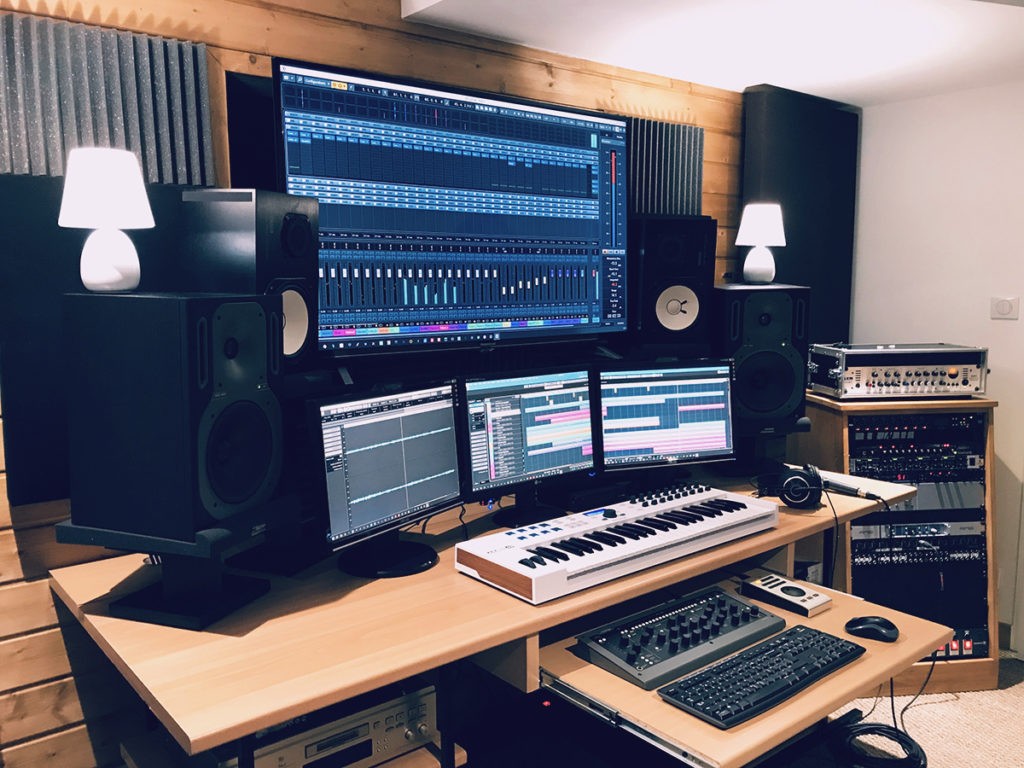
1. The studio computer

The computer is almost essential since today, most recordings are digital.
To record your music and mix it, you will need a place to store the files and install the various software you will be using.
That’s why it’s important to choose a good computer: it’s the foundation of your home studio setup.
If you already have a PC that works well enough, I recommend keeping it. The advice may be a bit obvious, but I prefer to say it: avoid spending your budget on things you already have, even if they are not perfect.
However, if your computer is aging or not powerful enough, you will likely need to get a new one: indeed, home studio use is relatively resource-intensive (RAM, hard drive speed, processor speed…). This explains why, often, the computers best suited for home studio use are those designed for gaming.
Like, for example, those from Asus, which are often very powerful.
Of course, nothing prevents you from building your own tower to save some money and especially to choose exactly what you need.
👉 For more information, visit my guide to computers for home studio
2. The audio interface (or “sound card”)
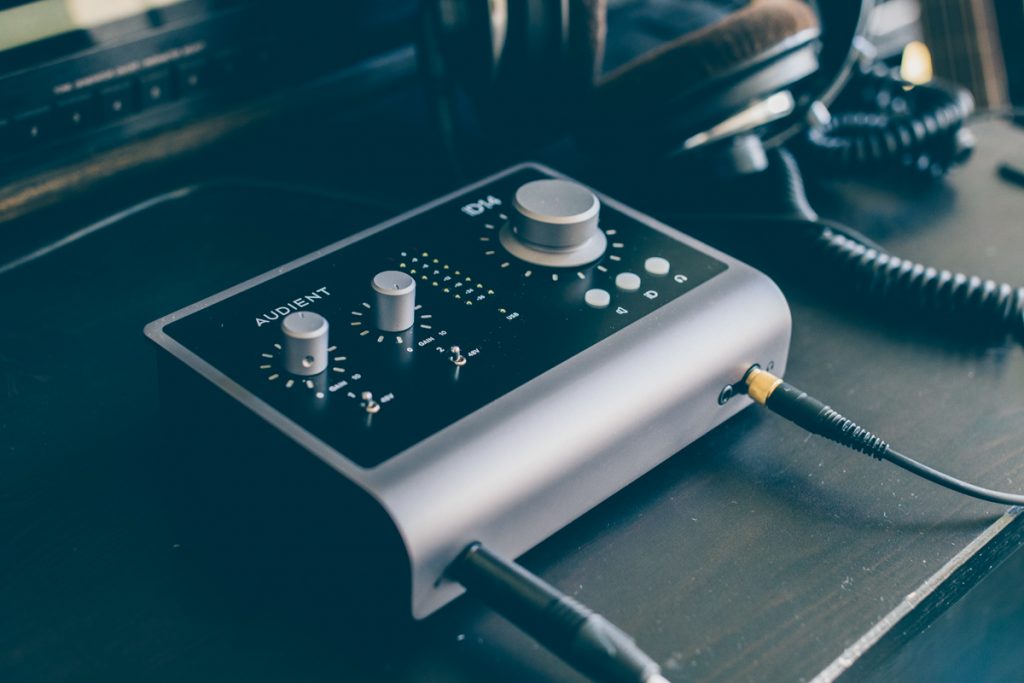
Another absolutely essential element among the equipment for recording at home is the audio interface.
And not the mixing console, which is rarely useful in a home studio setup.
3. The DAW

The DAW, also called a DAW or sequencer, is the software you will work with 99% of the time.
To simplify, it is through this software that you will be able to record audio and mix the different recordings together.
You will thus be able to edit audio tracks, add effects, adjust audio signal levels — in short, everything needed for mixing and mastering.
While there are a few free options, most DAWs are paid with quite variable prices.
Personally, I almost exclusively use Presonus Studio One, which I love.
However, choosing a DAW is something quite personal: all DAWs allow you to perform the same basic actions, and they all have the same sound.
However, they differ in how you work — in other words, the workflow.
👉 I talk a bit more about all this in this big article on DAWs, which will undoubtedly help you choose.
4. Monitoring Speakers

Now that you have your computer, your interface, and your DAW, you’ll need to be able to hear the sounds you produce or record.
For that, you will need speakers suitable for home studio use, that is to say, monitoring speakers.
Nothing to do with hi-fi speakers or standard PC speakers: monitoring speakers are designed to be as flat and neutral as possible in terms of frequencies and signal quality.
And this neutrality is really important.
Imagine using speakers where the bass is too prominent: when you mix your tracks, you will think there is enough bass and adjust your levels accordingly.
But as soon as you listen to your track on other speakers, your bass will have disappeared because you set them too low!
Hence the usefulness of monitoring speakers, which will help you make the right decisions during mixing.
The fact is that your budget will necessarily be the limiting factor, as there are all possible prices, from €70 to €3000 per speaker.

For beginners, my usual recommendation if you don’t want to spend €1000 on your speakers is to go for the ADAM T7V, which really offers a great price-quality ratio (in the photo above).
👉 Click here to see the price of the ADAM T7V: Thomann Woodbrass Amazon
In any case, avoid getting really low-end monitoring speakers, which won’t be up to par.
Point of attention: having good speakers is great. However, to truly benefit from them, it’s important that the acoustics of the room are treated — at least if your budget allows it. We’ll talk about this a bit later.
👉 To see my recommendations, visit my monitoring speaker buying guide.
If you want to add a subwoofer to your speakers for a more extended response in the low frequencies, I also recommend checking out my guide on subwoofers.
5. The Monitoring Headphones
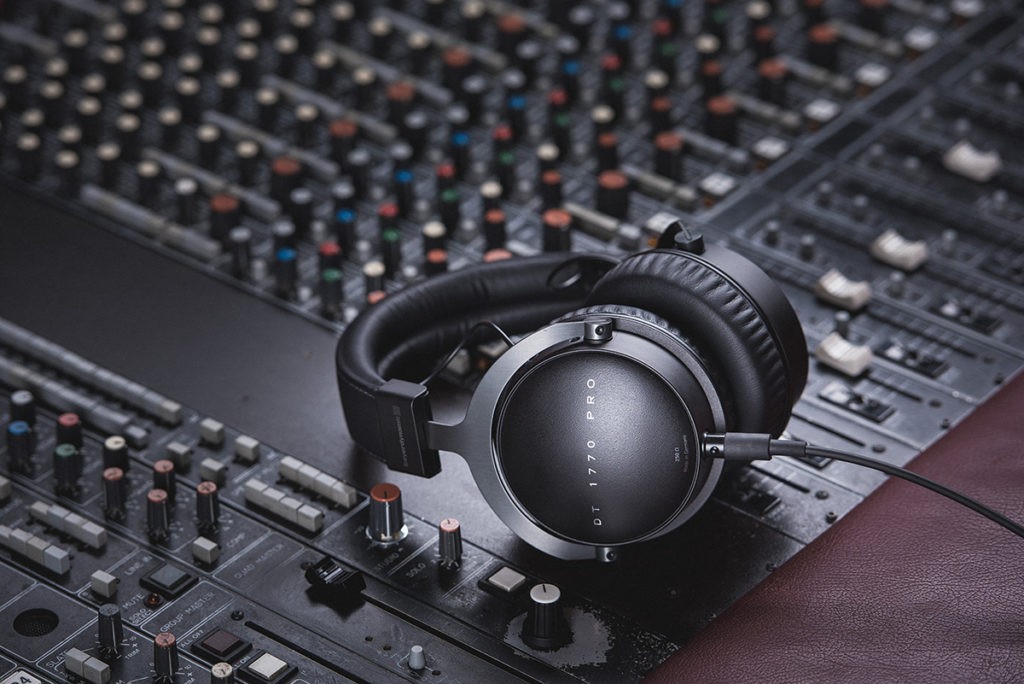
The monitoring headphones are also part of the standard equipment in a home studio.
Generally, they are connected directly to the audio interface, but it is also possible to use external amplifiers.
To keep it simple, there are two types of headphones: closed headphones (like the famous DT 770) and open headphones (like the AKG K240 MKII).
For tracking/monitoring use, that is to say, to listen to something during a recording phase, we often lean towards closed headphones. This avoids the “bleed” of the headphone sound into the microphone.
However, headphones can also be used for mixing (even if you are sometimes told otherwise — I let you watch the video above on the subject). In this case, we would rather use open headphones.

That said, if your budget allows it, there is ONE headphone that I often recommend to beginner home studio users (or not, by the way), and that I use myself extremely often, the Audio-Technica M50X.
The price/quality ratio is really excellent, and even though it is a closed headphone, it is balanced enough to allow for mixing.
👉 Click here to see the price of the M50X: Thomann Woodbrass Amazon
It is worth noting that in a home studio setup, using headphones during mixing can potentially help mitigate the acoustic problems of your room.
Indeed, wherever you are, headphones will always have the same sound, which is a significant advantage.
👉 For more info, feel free to read this article on audio headphones in home studio.
6. Microphones

Of course, unless you are simply looking to record your electric guitar by plugging it directly into an interface, you will probably need microphones to capture the sound of your voice, your amplifiers, or even your drums.
Fortunately or unfortunately, there are tons of different microphone models, which are divided into several categories such as dynamic microphones or condenser microphones.
Depending on the use you want to make of them, you will not necessarily lean towards the same type, model, or brand.
Of course, there are microphones that work well for singing, or others that work perfectly for acoustic guitar.

By default, I often advise home-studiers to get an Aston Origin, or for example a Rode NT1, which you can see above.
The latter somewhat replaces the famous Rode NT1-A, which has long been the number one choice for beginner home-studiers.
Beyond the fact that it sounds better, the NT1 comes with a cable, a pop filter, and a shock mount. Very handy for the “all-in-one” aspect.
👉 Click here to see the price of the Rode NT1: Thomann Woodbrass Amazon
But if you really want to dive into the subject, it is important to be aware of the differences between types of microphones and the various existing models.
👉 On this point, my guide on studio microphones will give you all the necessary information to choose your microphone.
7. Acoustic Treatment

In the budget that everyone allocates to set up their home studio, acoustic treatment usually occupies only a small place.
If it is even present.
It must be said: buying acoustic panels is much less exciting than buying a new microphone or a new preamp.
But it remains one of the essential elements in a studio or home studio.
Indeed, all rooms have acoustic problems.
All of them.
Problems in the bass first. But also various reverberations in the mids and highs.
Acoustic treatment is simply an association of panels and other reflectors that will allow you to minimize these problems.
In a home studio setup, it is always complicated — especially because you can’t always choose the room you’re in and it is generally too small.
That said, having basic acoustic treatment can already bring a big improvement (if of course you are using monitoring speakers).
👉 Check out my reference article on acoustic treatment in the studio to learn more… 🙂
8. The Preamp(s)

Sometimes, advice is given to beginners that, to improve your recordings, you need to buy this or that preamp.
But what is it about?
Simply put, a preamp is what will allow you to amplify the audio signal from a microphone.
Your audio interface already has preamps (integrated into the inputs for which you have a Gain adjustment).
To start, you won’t need to buy an external preamp.
However, this is a fairly common upgrade in home studios to go further in terms of recordings.
Typically, using an external preamp can add color to the signal to give it a warmer or more vintage character.
Another option: some mic preamps have multiple channels which, in the right configuration, allow you to record more microphones than your interface would allow on its own.
👉 I won’t say more, my guide to mic preamps will give you all the necessary information on this topic.
9. MIDI Keyboards and Control Surfaces

If your home studio is only dedicated to recording acoustic instruments, guitars, or vocals, then the MIDI keyboard will not be part of the basic equipment to buy.
On the other hand, if your goal is to do computer-assisted music in your studio, with virtual synths or not, then having a good quality MIDI keyboard or a MIDI control surface will be almost essential.
A MIDI keyboard is simply a keyboard that does not contain sound but is capable of sending electronic messages indicating:
- which notes are played;
- and with what force (what velocity) they are played.
For example, the Keylab Essential keyboards from Arturia, which can be seen everywhere in home studios.
Some connect directly via USB, while others have MIDI outputs that you can connect to your hardware synths or to the MIDI input of your sound card.
The concept of “control surface” is a bit broader since it includes MIDI controllers with pads that you can tap to create your rhythms, melodies, and trigger your samples, as well as advanced surfaces dedicated to audio mixing (and here, we go beyond simple computer-assisted music usage).
Depending on your needs, you will therefore need either a keyboard, a control surface, or both! 🙂
👉 Click here to check my selection of the best MIDI keyboards
👉 If you are more into beatmaking & control surfaces, then check out my file on beatmaking
10. Essential Accessories
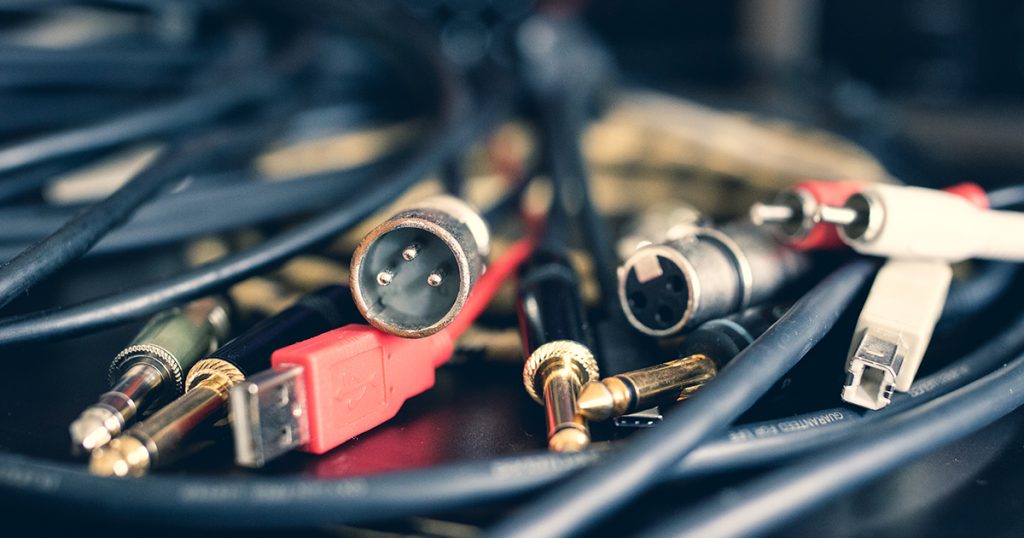
In addition to the main equipment, a home studio also requires a series of essential accessories to ensure proper operation and comfort while working. These small elements, often underestimated, can make a real difference in terms of sound quality and ergonomics.
Cables: don’t overlook them…!
… and above all, don’t forget to get some.
All your equipment must be connected to each other: audio interface, speakers, microphones, instruments… A bad cable can introduce unwanted noise or signal problems, so it’s best to choose them well from the start.
Cables are part of the essential accessories in a studio, and it is important not to make mistakes so that everything works correctly.
👉 Need a jack cable? It’s essential for connecting a guitar or a synth to an audio interface. Click here to see my buying guide for this type of cables
👉 Need an XLR cable? Essential for connecting a microphone to your interface, with or without phantom power. Click here to see my other buying guide on this topic
👉 Want to know more about all the connections used in a home studio? I have a detailed article on this: click here.
The pop filter: a must-have for singing
If you are recording vocals, a pop filter is an essential accessory. It reduces plosives (the “P” and “B” sounds that create unpleasant bursts of air in the recording) and improves the clarity of your recordings. It’s a small investment that makes a big difference!
👉 To know which model to choose, visit my complete guide on pop filters
The microphone stand: comfort and stability
A good microphone stand is crucial to avoid unwanted vibrations and to position your microphone stably and comfortably.
Also, I recommend forgetting about low-end models that fall with the slightest movement, for the safety of your microphone.
👉 If you’re looking for a reliable option, I recommend getting microphone stands from the brand K&M, known for their sturdiness and reliability. That’s what I use every day.
11. Mixing consoles

By default, I generally recommend working with audio interfaces rather than mixing consoles: it’s more practical, the investment is potentially lower, and it’s simply more suited for home studio use.
However, there are certainly various situations where a mixing console can be a useful tool in the home studio, for example if you want to connect many synthesizers.
👉 Here is my buying guide on analog mixing consoles
12. Synthesizers

While it is not essential equipment for all home studios, it is certainly something interesting to have when producing electronic music, or at least when you need certain synth sounds in your productions.
It is often more enjoyable to manipulate the knobs of a real synth rather than adjusting virtual instruments with a mouse — although there are undoubtedly excellent plugins available on the market.
👉 If you are interested in synths, click here to discover my recommendations for beginners
13. Headphone amplifiers

Most of the time, you won’t need a headphone amplifier because there is already at least one built into your sound card (audio interface).
That said, in a number of cases, a dedicated amplifier can be useful, for example if you want to be able to plug in multiple headphones at the same time when recording a group of musicians.
In this case, you have the choice between getting a basic headphone amplifier (which I recommend if the need is really just utilitarian) or going for something higher-end (especially if you want to plug in a headphone for mixing/mastering).
👉 Click here to discover my suggestions for headphone amplifiers for your (home) studio
Home studio equipment packs, an option?

If you’re looking for your very first equipment to dive into the world of home studio, starting with an equipment pack can be an option.
Some brands indeed offer equipment packages, which can be interesting from a financial perspective but also to ensure you have “everything you need.”
For example, for someone who just wants a bit of equipment to sing and record.
In this idea, the Focusrite pack can be a good “no-brainer” solution for those with a fairly limited budget.
That said, the quality is not always perfect, so I have also prepared a dedicated article in which I recommend “my” own equipment packs, meaning selections of compatible and quality home studio equipment for different budgets.
👉 So head here to read my home studio pack recommendations
Some tips for choosing your home studio equipment well
Beyond just the list of necessary equipment to set up a home studio, I thought it would also be useful to share with you some generic tips on buying gear.
Typically, tips I wish someone had given me when I started in my studio. 🙂
Avoid very low-end equipment
It’s a fact: home studio equipment is expensive.
When starting out, we often tend to look at what we can save money on.
Will this €30 microphone be enough? Will this €40 interface be sufficient?
However, there is a fine line between buying entry-level equipment that will be perfectly suitable for a beginner and buying very low-end equipment that will cause more problems than it solves.
For example, on some unknown Chinese brand microphones, like those found on Amazon or Aliexpress, I’ve seen cables plugged in the wrong way. On ultra low-end sound cards, the background noise or latency will be too high.
And so on…
If necessary, try to save one or two more months to buy a model of recognized quality, rather than very low-end equipment.
Don’t buy all your equipment at once
To produce a good quality track, you don’t need a lot of equipment.
In other words, setting up a cheap home studio is possible for a beginner.
However, by reading articles or asking for advice online, you quickly get the impression that you will need to buy an impressive amount of gear at ever-increasing prices.
Rather than building lengthy lists for your home studio, I recommend buying your equipment gradually.
Start with the minimum you need: computer, audio interface, headphones, microphone.
And then, add new things gradually.
By doing this, you will have time to better understand your needs and to better grasp what you really lack.
For example, as I mentioned earlier, there’s no need to buy an external preamp when you’re just starting out. However, after a few months/years, it’s likely one of the first things you’ll buy to improve your home studio.
Think about your home studio setup for tomorrow
(To moderate what I just said in the previous chapter.)
Buying in stages doesn’t necessarily mean settling for minimum features each time.
Imagine that today, you’re looking for equipment to record your voice and your acoustic guitar. So, with just one microphone, since you’re recording both in succession.
In this case, you will likely lean towards a sound card like the Scarlett Solo, with a single microphone input. This is ideal.

But now let’s imagine that in 6 months, you want to record your guitar in stereo, so with two microphones.
Well, in that case, the Scarlett Solo will hold you back, as it only has one suitable input, which will not be enough.
[Moral:] Before finalizing your equipment choice for your home studio, try to project yourself a bit: there’s no need to buy a huge interface with 50 inputs and connections, but conversely, buying one that strictly meets today’s needs without offering any possible evolution is probably not strategic…
In conclusion
There you go, you now know what equipment allows you to set up a complete home studio with all the appropriate recording and mixing gear.
Feel free, of course, to follow the various “learn more” links in each paragraph, which will allow you to go further and, typically, to know my recommendations for each type of equipment.
However, if you still have questions afterwards, don’t hesitate to ask them in the comments: I respond to everyone 🙂