Are you a guitarist looking to record your electric guitar but unsure of the procedure to follow?
Don’t worry — you’ve come to the right article! 🙂
Indeed, I have compiled as much information as possible on this page to explain how to record your electric guitar on PC or Mac, whether you already have a home studio or are about to embark on this adventure.

Similarly, it doesn’t matter whether you want to simply record a few riffs “for fun” or to practice, record your compositions, or produce a complete demo for your band: all the main techniques for recording electric guitars are gathered in this article.
Because, of course, it’s not enough to just plug your guitar into your PC to be able to record it… 😉
More concretely, here are the different points we will cover together:
- The basics of electric guitar recording
- Method #1: Mic’ing a guitar amp
- Method #2: Recording a guitar without an amp
- Method #3: The ideal method
- Method #4: Using a portable recorder
- Electric guitar recording FAQ
The basics of electric guitar recording
Recording a guitar is not so different from recording vocals, if you are familiar with the world of home studio.
If that’s the case, you might skip this part, which is mainly dedicated to beginners.
If, on the other hand, you have never recorded anything or are unsure about mastering the basics, here is a first chapter that should enlighten you enough to understand the rest.
Capturing a signal
There are several different methods to record an electric guitar, but overall they are all based on the same concepts.
First of all, there is the notion of source signal: this is the signal you want to record. The raw signal.
For electric guitars, there are two possible types of source signals:
- the signal coming from the guitar’s pickups itself — namely an electrical signal measurable in millivolts (mV);
- the signal coming from the guitar amp — namely a sound wave whose intensity can be measured in decibels (dB).
Moreover, no matter how you record your guitar: you will always use a capturing system.
Typically, a microphone that will allow you to record a sound.
The role of the audio interface
Once your signal is captured, you will need to record it, for example on your PC or Mac.
For that, you can’t expect to have good quality by plugging into the 3.5mm mic jack of your computer: you need equipment dedicated to home studio use.
This equipment is what is called an audio interface.

Basically, a kind of sound card that is often connected via USB and will, in a way, bridge the physical world and the digital world.
To get started, a simple Focusrite Scarlett 2i2 (see photo below) can be more than enough.
► To learn more about the subject, check out my article dedicated to interfaces.
What software to use to record my guitar?
Of course, whether you are on PC, Mac, or even tablet, you will need software to process and manage the tracks you have recorded.
For really basic editing of your recordings, you can use a free tool.
Thus, on Windows, a tool like Audacity can fulfill this role.
On Mac, you can also choose to record your electric guitar on Garage Band — which is basic but very good for beginners.

That said, in most home studios (and of course in professional studios), we usually use a recording software called DAW (Digital Audio Workstation), STAN (Station de Travail Audio-Numérique) or sequencer.
As soon as you want to record yourself a little seriously, you will absolutely need such a tool.
► Feel free to check out my recommendations on DAWs to learn more.
Method #1: Mic’ing a guitar amp
The first technique for recording your electric guitar is probably the most obvious, as it simply involves recording the sound coming from the amp.
Connection
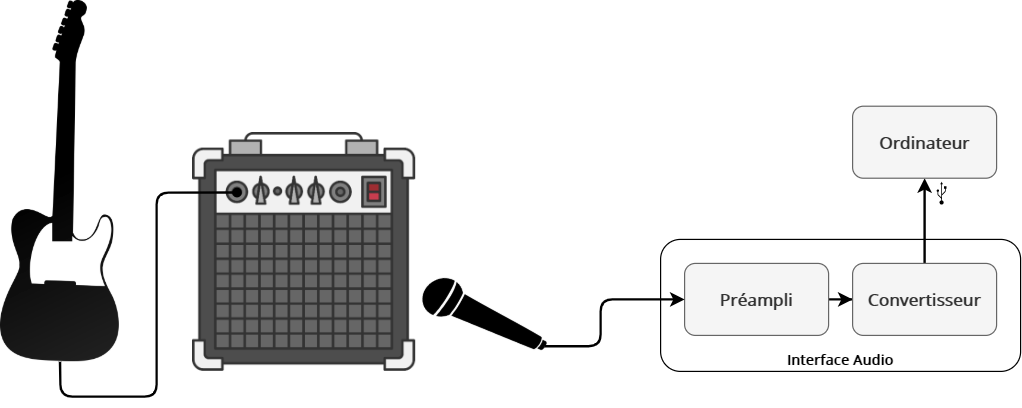
In this scenario, the connection to make is quite logical:
- you plug your guitar into your amp and play;
- one (or more) microphone(s) picks up the sound emitted by the amp;
- The captured sound is pre-amplified at the interface and then sent to your computer (through the built-in converter).
Of course, while the quality of your recordings depends on many factors, it will primarily depend on the quality of the amp and the microphone.
If your amp is a small 10-watt practice amp, you will not necessarily get the sound of a big Marshall tube amp with its 4×12 cabinet.
Tip: That said, in (home) studio and unlike a live recording, the best amp is not always the biggest.
How to position the microphone?
When recording a guitar amp by miking it with a microphone, the position of the microphone is crucial.
Yes, crucial.
A few millimeters can take you from a perfect sound to a mediocre sound.
Often, the basic position will be to place the microphone as close as possible to the grille of the speaker or your combo amp.
The closer the microphone is to the grille, the less you will capture the ambiance and natural reverb of the room. And vice versa.
Tip: If the acoustics of your room are not great, it’s better to position your microphone as close to the amp as possible and add a slight reverb during mixing.
Beyond the mic-speaker distance, it is absolutely essential to position the mic correctly in terms of distance from the speaker cone:
- if you place it right in the center of the speaker, the sound will be bright and aggressive. Rarely a good idea;
- but the further you move it laterally towards the edge of the speaker, the darker the sound will be, benefiting from much more detailed bass.
Finally, the angle of the microphone also affects the texture. Don’t hesitate to vary this.
Which microphone to choose for mic’ing an amp?
Many microphones can be used to mic a guitar amp, but they all have different sounds.
Choosing the right mic to work with is therefore just as important as how you position it.
My guide to microphones for guitar amps should help you make this choice.
However, for me, the must-have model is the famous SM57 from Shure, which is just THE reference for anything related to guitar amps.

However, feel free to pair it with a second microphone.
Indeed, it is often interesting to combine the sound of two microphones whose balance we will adjust during mixing.
We can thus imagine, for example:
- having two microphones (two SM57s or not) close to the speaker, but one positioned at the edge of the cone while the other is more central;
- having an SM57 close to the grille, and a more distant condenser microphone that would capture the ambiance of the room.
Advantages and disadvantages of this method
The big advantage of this guitar amp recording technique is the sound.
Since you are capturing the sound of your amp directly, there is no digital simulation that could harm the realism.
This may also be the most logical technique: you already have your amp, you take a microphone and an interface, and there you go, you can record.
On the other hand, there are many disadvantages to working this way.
First of all, once the recording of your guitar is done, you can no longer touch it.
Sure, you can add effects during mixing, like equalizers, but the raw track itself is not modifiable — unless you re-record everything.
In other words, if you used the wrong setting on your amp or poorly positioned the microphone, well, it’s too late! 🙁
The second disadvantage of this method is that home studio conditions are not always perfect, and this can therefore harm your recordings.
Typically, the acoustics of the room will influence the sound captured by your microphone.
And then, if you are in an apartment, you probably won’t be able to crank your amp up, which can be a real problem for recording metal guitar.
Method #2: Recording a guitar without an amp
Another option for recording your electric guitar is to not use an amp but to use amp simulations instead.
Due to its ease of setup, this technique is very popular in home studios (or by guitarists wishing to record themselves simply).
It’s also a good idea if you are in an apartment and want to record your guitar without disturbing the neighbors…
In terms of connection, there are two possible scenarios that are relatively equivalent:
Connection (basic case)
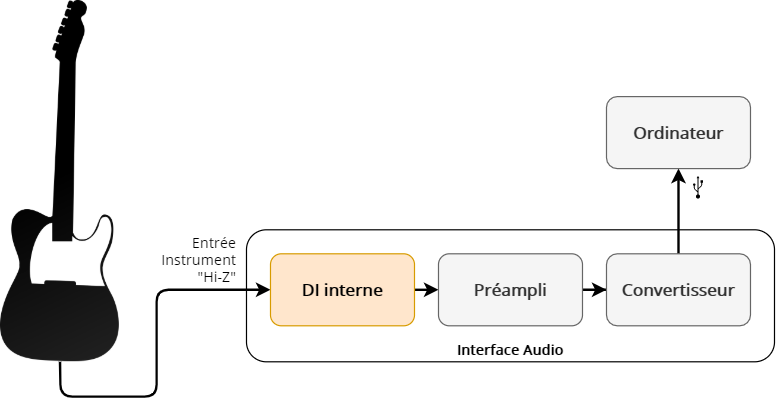
The diagram above presents the simplest case, which is also the most commonly used in home studios:
- the guitar is connected directly via a mono jack cable to an instrument input (Hi-Z or high impedance) of the audio interface
- the raw signal from the guitar is then preamplified and converted to digital format to be recorded on the PC.
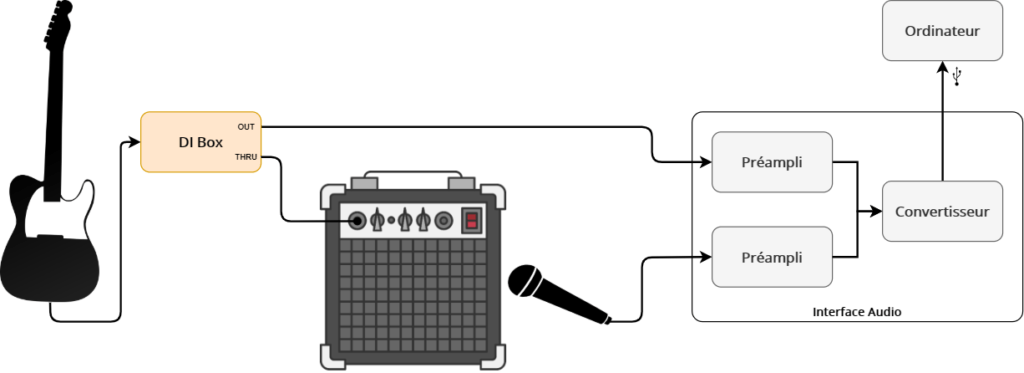
Connection (another option)
Now, there is a second option that is quite similar which consists of using what is called a direct box or more commonly “a DI”, and which is represented in the diagram below:

So, what is it for and what is the difference with the scenario just above?
Well, the fact is that when you connect your guitar to an instrument input on your interface, the signal passes through an electrical circuit that allows, among other things, to correct the impedance and is equivalent to a DI, then through a preamp.
When you first connect your guitar to a DI and then connect it to a preamp, it is therefore equivalent to not using the built-in DI circuit of your audio interface.
In the end, both connections are generally equivalent, except that using an external DI box often allows for a slightly better sound than if you connected directly to the built-in DI of your interface.
At least, this is especially true for entry-level interfaces.
And then, the DI also offers some additional options that we will talk about a bit later in the article…
Amp and cabinet simulations
Whether you use the first or second connection diagram, you will get a completely raw sound, without effects, which will not be fully usable.
It will look something like this:
This isn’t great, and that’s normal, since it’s just the signal emitted by the guitar. And this one hasn’t gone through an amp or a speaker.
Fortunately, since the signal is recorded on a computer, you have access to all kinds of plugins that you can load into your DAW, which will simulate the amps and speakers.
As for amps, there are a number of free simulations, but I also recommend checking out the paid simulations, for which here are some recommendations:
- all the simulations from Mercuriall Audio, which are just excellent;
- all the simulations from Neural DSP (more oriented towards heavy sound);
- Amplitube from IK Multimedia;
- Bias FX from Positive Grid
(and no, I don’t really recommend Guitar Rig from Native Instruments: some simulations are decent, but there are much better options on the market.)
Of course, just like “in real life”, you need to add a speaker simulation.
This time, the technology is quite different: while amp simulations are mostly based on algorithms, speaker simulations are most often based on “Impulse Responses”. These Impulse Responses or IRs are actually recordings of the sound properties of speakers.
In principle, to simulate a speaker, you need:
- an IR;
- a plugin (loader) to load this IR.
Note that sometimes, both are combined within the same plugin.
For more information on the subject, check out this article.
In the end, if we take our audio example a bit higher and add an amp and speaker simulation (in this case Euphoria from Mercuriall), we can get something like this:
Which DI to use

If you’re starting out with electric guitar recording without an amp, I recommend plugging your instrument directly into the appropriate input of your audio interface.
However, if you want to invest in a dedicated DI, I recommend the models from Radial — they are a bit more expensive than those from the competition, but very high quality.
My guide on direct boxes will give you all the necessary information to choose your DI.
Advantages and disadvantages of this method
There are two major advantages to recording your guitar without an amp.
The first, is the simplicity of recording. You just need to plug in the guitar and click “record”.
It’s hard to make it simpler: no need to worry about mic placement or amp settings.
Then, the cost of the setup is much lower: no need for an amp, no need for a microphone, no need for a mic stand: you just need to get the audio interface, which will be essential in any case — no matter which recording method you choose.
In exchange for all this, there is still a disadvantage: even though amp simulations are excellent today, you can hear differences compared to the sound of a real amp.
In a mix, this difference may not always be detectable, but the simulations may be recognizable, for example, on parts where your playing is particularly expressive.
Indeed, the reaction of amplifiers to dynamic variations is one of the most complex things to model.
Fortunately, during mixing, certain techniques will help mitigate this issue by improving the sound of these simulations.
Method #3: The Ideal Method
Beyond the first two connection strategies presented earlier, there is an approach that allows for optimal recording of the electric guitar, which is again based on the use of a DI.
Whether you are working in a studio or home studio context, this approach seems to me to be the best because it is the most flexible, although the first two are perfectly valid and I would even say: proven.
Connection
Earlier, we talked about DIs or direct boxes as tools for recording the raw signal of the guitar.
Well.
The fact is that DIs actually have two outputs:
- one output is dedicated to being connected to a microphone preamp (like those built into interfaces)
- and another output, often called THRU, which allows sending the guitar signal to an amplifier. As if you were plugging the guitar directly into the amp.
This means you can record the raw signal of your guitar directly through your audio interface, and at the same time record the sound coming from the amp via a microphone.
This type of connection gives you the opportunity to benefit from both the advantages of method #1 and those of method #2 detailed above.
Typically, in this kind of situation, it is common to use the amp signal by default — and if that is not good, there is always the raw signal as a backup for use with an amp simulation, or with the technique we will see right away…
The Reamping Technique
Once you have a raw recording of an electric guitar signal, you can use the reamping technique.
What is it about?
Simply put, since you have the raw guitar signal available on your PC or Mac, you can send it back to the amp of your choice and record it.
Imagine the situation: you recorded your track on a Marshall, but ultimately you prefer the more modern sound of an ENGL. If you recorded the DI signal of the guitar at the same time, you can, thanks to reamping, redo your recording without any problem! 🙂
At least, I say “without any problem”, but there is still a small issue: your amp expects a signal that resembles that of a guitar.
That is to say, with a level (millivolts) corresponding to that of a guitar, and with a high impedance.
Except that these are not the default characteristics of the sound coming from your audio interface.
So, you need to use what is called a reamping box, which looks like this:

You will place this reamping box between your interface and your amp.
Once this connection is made, you can reamp the signal from your guitar, and thus re-record your guitar track by changing amps, microphone positions, or simply by modifying the amp settings.
Advantages and Disadvantages of This Method
Objectively, for me there are only advantages to recording a guitar this way.
If the recording of the amp is sufficient, then you can use it for your mixing.
But if there is a problem, having the raw signal available allows you to use both amp simulations and employ the reamping technique to produce a new recording.
In this case, it is difficult to find disadvantages, except that the connection becomes a little more complicated (and even then…).
Method #4: Use a Portable Recorder
Finally, there is one last option for recording your electric guitar, namely using a portable recorder.
Specifically, it is a device with built-in microphones that you can place, for example, in front of your amp.
You click on “record,” and everything is stored on an SD card or equivalent.
The most well-known model, and the one I recommend if you want to go in this direction, is the Zoom H4N. It is simply THE reference for portable recorders.

That said, even though it is sometimes possible to connect other microphones to it, using a portable recorder is only a good idea if you find yourself in the following situations:
- I want to record my band’s rehearsals, just for memories;
- I want to record myself while on the road / in an ultra-portable way;
- I want to keep some riff ideas with better quality than my phone;
- I am allergic to technology and do not want to record anything via my computer.
Otherwise, I strongly recommend using the other recording methods mentioned above: you will achieve much better quality results.
FAQ for recording electric guitar
The chapters you have just read should already give you a wealth of information on recording electric guitar.
However, to go further, here are some answers to the most common questions on the subject.
Do you need a preamp to record an electric guitar?
Audio interfaces all have built-in preamps.
So whether you connect your guitar directly to it or use a microphone to capture your amp, you will always go through a preamplification circuit.
Therefore, it is not necessary to buy an additional analog preamp.
However, in the studio, external preamps are often used to color or enhance certain aspects of the sound, and in fine achieve better quality recordings.
If you are a beginner, using such preamps is clearly unnecessary and will even complicate your recording process. And thus your learning.
If, on the other hand, you are already a bit experienced, buying an external preamp could potentially be an upgrade for your home studio…
Do you need a DI box to record?
It is possible to connect a guitar directly to all audio interfaces on the market: they all contain a DI circuit.
The corresponding input may be indicated by a guitar symbol or labeled Hi-Z (high impedance), Instr (instrument), DI…
Therefore, it is not essential to have a dedicated DI box to record a guitar — but of course, it depends on the recording setup you have chosen.
What cable to use to record your guitar?
There is no reason to use a different jack cable than the one you usually use.
That said, “entry-level” cables may tend to pick up electromagnetic interference, which results in higher background noise and interference in the audio signal.
So don’t hesitate to get a good quality cable to record your instrument.
► Click here to discover my guide on jack cables
Can you use condenser microphones?
It is possible to use both dynamic and condenser microphones.
By default, I recommend having at least one SM57, which is dynamic: it is the reference microphone for capturing amps.
But to go further, you can very well pair it with a condenser microphone. However, be careful: depending on the volume of the amp, it may be better to move the condenser microphone back a bit to avoid distortion.
Do you need to use two microphones?
No, you do NOT have to use two microphones: it is just an option.
Many albums have been recorded with a single microphone, without any issues.
Also, if you are just starting out, it is better to use a single microphone at first (no matter what you might read on some forums).
Once you master recording with one mic, you can add a second one if needed.
Can you use a delay/reverb pedal, or another effect during recording?
Yes, it is possible, but it’s generally a bad practice.
Indeed, once your recording is finished, you won’t be able to modify, for example, the amount of reverb or delay.
So, it is far better to record without effects and add them during mixing.
In conclusion
There you go, you now know almost everything about recording electric guitar.
If you have any questions left, feel free to ask them by leaving a comment below… 🙂
Keep reading: The equipment needed to set up a home studio.