You want to record your piano, whether it’s upright, grand, or digital, but you’re not quite sure how to do it? Or maybe you’ve already done some recordings, but you’d like to know the best practices to improve your sound captures?
Well, you’ve come to the right place :)! In this article, I have indeed combined a maximum of information regarding piano recording.

Because indeed, it is anything but the simplest instrument to record: to achieve a good sound, it’s important to keep in mind the main concepts and the main rules to follow.
And then, you also need to know enough about the necessary equipment to be able to record a piano correctly.
So we will cover all these topics throughout this article:
- The basics of piano recording
- Preparing the acoustic piano for recording
- Which microphone to choose for recording your piano?
- Techniques for recording an upright piano
- Techniques for recording a grand piano
- Techniques for recording a digital piano
The basics of piano recording
If you are already familiar with the usual studio and home studio equipment, the recording process shouldn’t seem complicated to you.
(You can even skip this chapter in that case…)
But if you are a beginner, I recommend reading the following advice to master the basic concepts of recording.
The source signal
First of all, let’s talk about the source signal emitted by a piano.
If it’s an acoustic piano, this corresponds to the sound emitted by the strings and amplified by the instrument’s soundboard.
In this case, to capture this signal, you will need to use one or more microphones.
If it’s a digital piano, then the sound information takes the form of a continuous electrical signal emitted by the instrument via the audio output connections (usually jack outputs).
In this case, you won’t need microphones, but you will still need to use a capturing device to record the sound of the piano on your computer (or on your phone, for example).
The audio interface
To actually record the sound captured by the microphones or emitted electrically by the digital piano, you need an audio interface, also called a sound card.
This means a box, which can vary in size, that will be connected to the computer via a USB or Thunderbolt cable, and which will convert the captured signal into a digital signal that the computer can understand.

In other words, it is the audio interface that allows you to record the sound on your PC.
If you are a beginner, you do not need to buy a very expensive / high-end model.
That said, make sure to have two audio inputs on the sound card you choose: indeed, as you will discover later in the article, the piano is often recorded in stereo.
Stereo, therefore two different audio channels, thus two different inputs on the interface.
As a result, a small-sized model like the Audient iD14 MKII can do the job very well, especially since the built-in preamps are of good quality.
But there are many different models, each with its own specifications.
► Also, if you need an audio interface to record your piano, I recommend reading my complete guide on audio interfaces for home studio.
Note that a number of sound cards can be connected to a smartphone: provided you verify on the manufacturer’s website of the interface you choose, you will be able to record your piano on your mobile phone or on an iPad if that is your choice.
Note: all audio interfaces have built-in microphone preamps. However, in the long run, and to improve your piano recordings if you use microphones, it may be worthwhile to invest in high-end preamps.
What software to use to record piano?
Of course, you also need software to record the audio signals transmitted by your audio interface.
If you are a complete beginner and simply want to capture a raw recording of your piano, a basic tool like Audacity or GarageBand may suffice.

However, it is likely that you will quickly want to add effects to your recordings: equalization to correct certain frequencies, reverb to recreate a sense of space around the piano, etc.
Therefore, I strongly recommend that you lean towards professional software from the beginning for your piano recordings: this is what is called a DAW (Digital Audio Workstation) or STAN in French (Station de Travail Audio-Numérique).
That way, you will immediately have the right reflexes and best practices.
► For more information on this topic, visit my complete guide to DAWs.
Preparing the acoustic piano for recording
If you want to record an acoustic piano, it is important to keep in mind certain elements that I have grouped under this title of “preparing the piano”, in order to maximize the quality of the recordings you will produce.
Before even placing any microphone, you need to ask yourself certain questions.
Otherwise, the risk is to have recordings that are not satisfactory.
A word about the pianist
First of all, the pianist.
This may seem obvious, but it is too often forgotten: the quality of the performance directly impacts the quality of the recordings produced.
Whether you are the pianist or not, it is important to prepare well in advance of the recording session.
This means practicing to play accurately and without mistakes, for example with a metronome.
But it also means asking yourself about the recording.
If you play aggressively and without nuance while you want to achieve an intimate and soft sound, know that neither the recording nor the mixing can correct your playing style.
And conversely, if you want something sharp, and you play very softly, that won’t work! 🙂
So take the time, before hitting the Record button, to think carefully about the playing style you want to give to your recording.

Choosing the piano
Of course, if you are working in a home studio context, it is unlikely that you will have the choice of instrument: few people have multiple pianos at home.
However, just as I explained earlier, the choice of instrument directly influences the final sound rendering.
For example, Yamaha grand pianos tend to sound a bit more modern, more pop — while Steinway or Bösendorfer pianos are often more suited for classical music.
Similarly, we will hardly ever use an upright piano for classical recordings. By the way, invented in 1826, upright pianos became popular precisely because they took up little space and were well-suited for domestic use — and not because they sounded better than grand pianos.
Tuning, maintenance, and preparation of the piano
As with a guitar, it is important to ensure that the piano is tuned before recording it.
In any case, if you want to make a professional-quality recording. Of course, if you are recording just for fun or for a quick demo, it won’t be necessary to bring in a tuner every time.
Note: in some cases, however, the slight out-of-tune nature of an instrument can be a character that one might want to preserve in the recording, for example, to give an old or melancholic feel to a piece of music.
Similarly, don’t forget to have all maintenance actions done that could help improve your recordings: adjustments of the mechanics, taking into account the humidity level of the room, squeaky pedals, etc.
Finally, depending on the style of music you play, it may be necessary to “prepare” the piano. I am particularly thinking of everything related to “felt piano,” especially Ólafur Arnalds, who sometimes places a cloth between the strings and the hammers to give a softer sound to his instrument.
The impact of the room’s acoustics
A point that is often forgotten: the acoustics of the room where your piano is located will strongly influence the quality of the recordings you will produce.
In practical terms, if the room is too small, you will have a harder time getting a good sound than if the room is large.
Unfortunately, in a home studio context, we rarely have access to large rooms with truly qualitative acoustics.
In this case, and we will go into more detail a bit later, you can still minimize the impact of the room’s acoustics:
- by treating the acoustics with absorbing panels;
- by positioning the microphones as close to the instrument as possible;
- by using cardioid microphones rather than omnidirectional ones.
Which microphone to choose for recording your piano?
There are many microphones on the market suitable for piano recording.
However, that does not mean you should make this choice hastily: the piano is a delicate instrument, covering a wide range of frequencies, so the choice of microphone and its positioning are two crucial elements for obtaining quality recordings.
The directionality of microphones
By default, I would tend to recommend omnidirectional microphones (“omnis”) to capture the sound of a piano.
Simply because they:
- often go lower in the bass frequencies, which can be useful depending on the piece you are playing;
- do not have proximity effect, which is ideal if you position them very close to the strings (this is referred to as “close miking”);
- will tend to better reproduce the acoustics of the room and thus give a more natural sound.
However, especially if your room does not have fabulous acoustics or if you prefer a more precise sound, you can of course use cardioid microphones.
Condenser microphones

By default again, especially if you are a beginner, I recommend leaning towards condenser microphones to capture your piano.
They will probably be the easiest to handle, and you can quickly achieve good results with a good level of detail.
In any case, it will be much better than dynamic microphones, which I find do not really have their place in recording this instrument.
However, you will need to choose between large diaphragm and small diaphragm condensers.
Small diaphragm microphones are generally a good first choice, as they tend to better capture transients and the attack of the notes.
However, if you have a limited budget and also want to use your microphones to record other instruments or especially vocals, then going for large diaphragm microphones is also an option.
In practice, nuances aside, you can achieve quality recordings with both small diaphragm microphones and large diaphragm microphones.
► Click here to see my selection of the best microphones for piano.
Ribbon microphones
Note, however, that it is also possible to use ribbon microphones, which can be useful for softening the sound of the piano and giving it a warmer, more intimate quality.
However, this is not necessarily the type of microphone I would recommend for beginners, as ribbon microphones generally have a figure-8 pickup pattern, which is more difficult to manage in small rooms.
► If you do wish to experiment, feel free to take a look at my selection of ribbon microphones.
The option of portable recorders

If you want to record your piano simply, you may have already heard of portable audio recorders, which are small battery or mains-powered boxes with two built-in microphones.
In fact, this is not a truly qualitative approach for piano recording.
Indeed, the sound is not perfect and there can sometimes be background noise.
For me, it remains usable if you really want a basic solution or if your goal is only to record demos, for example in a learning context to check the quality of your playing afterward.
But for studio quality, you will need real microphones.
Techniques for recording an upright piano
Microphone placement for recording a piano (upright or grand, by the way) is a real challenge, due to the obvious sonic complexity of the instrument and its size.
Paradoxically, there are countless recording techniques, from the simplest to the most esoteric.
In this article, I have chosen to discuss the most common microphone techniques and placements.

Be mindful of the distance
When you want to record the sound of an upright piano, it is essential to first consider the distance between the instrument and the microphone.
The further you move the microphone away from the piano, the softer and more muted the sound will seem, and the more you will hear the natural reverb of the room.
So, an ambient recording at a distance will clearly require a room that sounds good.
On the other hand, if you get closer to the piano, the sound will become brighter and sharper. This is also a reason why, in somewhat modern / pop recordings, we often do close miking, with microphones quite close to the strings, rather than distant recordings that would suit classical music better.
Position your microphones correctly
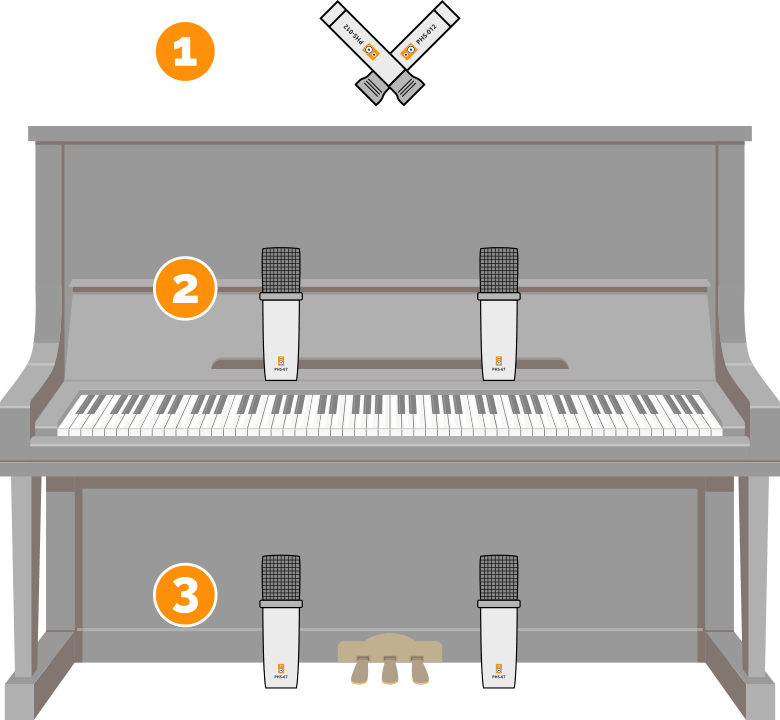
The diagram above represents different ways to position your microphones on an upright piano.
Position #1
If you cannot or do not have time to remove the front panels, the simplest way is to open the lid and position your microphones from above. This is not ideal, but it is a viable option.
Generally, the lid will always remain open to let the highs through, but in some cases a more closed position will help control the muted quality of the sound.
Position #2
A better position is however position n°2. In this case, the top panel has been removed (which is not visible in the diagram) and the microphones are positioned symmetrically relative to the pianist’s head. This is called an AB setup, also known as spaced pair in English.
You will achieve a clear sound with a lot of attack if you are close to the strings, which will allow the piano to cut easily through the mix.
However, it is important to be careful: especially with cardioid microphones, the more the microphones are spaced apart and the closer you get to the strings, the more you will create a sort of dip in the middle of the stereo image. You will then feel like you only have sound coming from the sides of the stereo image, with nothing in the middle.
So take the time to do a test recording to ensure that the stereo image is good right from the recording phase.
Position n°3
Another option is to position your microphones at the level of the bottom panel (which has been removed beforehand, of course). In this case, you can follow the same microphone approach as for position n°2.
However, the sound will be very different: as on the right microphone you will have fewer high strings nearby, you will get a softer sound that can be very pleasant.
Unfortunately, there is a downside: you may hear more pedal noise, and you will need to be careful about the pianist’s seat if it tends to squeak.
A small mono recording?
If you only have one microphone available to record your upright piano, I recommend starting by positioning it above the pianist, at the center of the keyboard.
This should allow you to have a good frequency balance.
Be careful not to get too close, otherwise you risk hearing the nearby strings too loudly, and conversely, not hearing the more distant strings (especially the highs) well.
Also note that mono recording is not necessarily related to a constraint of lacking microphones: a stereo piano recording is certainly more impressive than a mono recording, but that doesn’t mean it’s ideal in the mix.
Typically, in a rock mix, a mono recording will be more than sufficient!
To go further
Don’t hesitate to experiment with microphone positioning.
For example, positioning a pair of microphones behind the piano may seem counterintuitive but is regularly used to achieve a darker sound, perhaps a bit messier but also denser in the low frequencies.
Recording techniques for a grand piano
Due to its size, the grand piano is necessarily more complex to record than the upright piano.
However, some concepts will be similar.

The importance of horizontal and vertical positioning
On a grand piano, the lid greatly affects the dispersion of the highs.
As a result, the way you position your microphones around the piano will determine the type of sound you will get.
For a clear or even bright sound, you will position yourself in the perpendicular axis to the lid, which will of course be open. As with the upright piano, it can be closed for a duller sound, but generally on grand pianos, it is left open.
If you want a less open sound in the highs, you can try positioning your microphones behind the musician or conversely at the opposite end, towards the third leg of the piano.
In the same way, the height of the microphones also influences the sound.
Due to the many options, the specifics of each type of microphone and each recording configuration, it is impossible to say for certain “this position will be the right one for you”.
It is up to you to experiment, based on the concepts explained here, to find the exact position that will suit the sound that you want, in your room.
Be mindful of the distance
Again, distance is an important element to consider when positioning your microphones around your grand piano.
The further you move away from the piano, the more you will capture the overall ambiance of the room. In the case of a grand piano, this can create very beautiful things if the room sounds good — especially in the case of a classical music recording.
The closer you get, the more you will capture the direct sound of the instrument, and the more you will have something frontal, percussive.
If you place your microphones in close miking directly in the piano, then that will be the best way to obtain something bright and cutting in the mix.
In other words, distance affects both the ratio of “ambient sound of the room / direct sound”, but also the texture of the sound of the instrument.
Which microphone setup to choose?
First of all, I recommend positioning your microphones in an AB configuration, with a spacing of, let’s say, 40 centimeters to 1 meter.
This is generally a good way to record grand pianos, but the stereo image can sometimes be a bit vague, and you always need to pay attention to phase: make sure to check how your signal behaves when you listen to both mics in mono.
Another option is to place your microphones in an XY configuration, which will allow for a slightly more precise sound but less wide in terms of stereo image. However, this configuration has the advantage of not generating phase issues, which is convenient especially for beginners as it removes complexity from the recording process.
Two close miking options

If you choose this close mic positioning, I recommend testing one of the two following configurations:
- either just behind the music stand, as you then have direct access to all the strings (configuration n°1 in the diagram above);
- or in a mixed position, with one microphone on the high strings and one, further away from the stand, at the level of the low strings (configuration n°2 in the diagram above). In this case, you will capture a bit less of the hammer noise.
In both cases, in terms of microphone-to-strings distance, you can start with 20 to 30 centimeters. But this is just a starting point: feel free to adjust if the sound seems too raw and aggressive to you.
And in mono?
Finally, if you want to record a grand piano in mono, that is, with a single microphone, placement will of course be just as important.
Even more so, as you will only have one mic to capture all the nuances of the instrument.
In this case, I recommend applying the advice mentioned above while thinking about a point located roughly where the strings cross.
And then, if you lack bass, you can move the mic towards the low strings — and if you lack treble, well, you can move a bit towards the higher strings (while taking into account the position relative to the lid, of course).
To go further
To go further, you can of course experiment with all sorts of microphone configurations:
- for example, you can test the ORTF configuration, which generates a very wide and often very pleasant stereo image;
- or you can record your piano using the mid/side technique, which can be very nice.
Feel free to also combine two pairs of microphones:
- one in close proximity for the immediacy of the sound;
- and one at a distance to capture the ambiance.
These are necessarily more advanced techniques, so perhaps not to be tested first if you are completely new, but it is interesting to keep them in mind.
Techniques for recording a digital piano
If you now own a digital piano or other digital keyboard, your recording process will necessarily be simpler as it is indeed an electronic instrument.
So, no complicated microphones to position.
But there are still several options if you want to record your digital piano.
Option n°1: direct sound capture
Most keyboards have available audio outputs, usually in the form of jack outputs as seen in the photo below (“output”):

In this case, nothing could be simpler: just use jack cables (be sure to check your keyboard’s manual to see whether to use TS or TRS cables) to connect the digital piano to two line inputs on the audio interface.
Note: if you do not have an audio output on your keyboard (which is rare but can happen), you can to some extent use the headphone output instead. However, be careful with the output volume, which may not match what your sound card expects.
However, note that this technique generally does not provide excellent sound: even on relatively high-end keyboards, the audio samples contained in the keyboards are sufficient for practicing the instrument but not of high enough quality to sound convincing in a mix.
Option #2: virtual instruments, via MIDI
A better option, if you do not have an acoustic piano available for your music, is to use virtual instruments.
That is to say, instruments in plugin format (VST, AU…) that you will load into your DAW.
MIDI connections
Often (but not always), digital keyboards have connections that allow them to emit a MIDI signal.
MIDI, if you are not familiar, is a standardized protocol that allows digital communication between different music devices, such as synthesizers, computers, and MIDI controllers. The MIDI signal transmits information such as the notes played, velocity, duration, and other parameters related to the musical performance.
In short, if your keyboard has connections to emit MIDI, they can take two different forms:
- either you have a USB port on the keyboard that you can then connect to your computer to simply serve as a master keyboard;
- or you have a “MIDI OUT” output with a 5-pin connector directly at the back of the keyboard;
Sometimes, both options coexist on the same instrument.
Recording the MIDI signal
In the first case with the USB port, it’s very simple: the procedure to retrieve the MIDI signal will be explained in the manual of the electric piano.
Generally, you just need to plug in the right USB cable, and it works right away.
Sometimes, however, you may need to install a specific driver, but nothing too complicated.

In the second case with the MIDI OUT output (as shown in the image above), you then have two options to retrieve the MIDI signal on your computer:
- either your audio interface has a MIDI IN connection, and in this case, you will need to connect the two with a MIDI cable like this one.
- or your audio interface does not have a MIDI connection, and in this case, you will need to buy a small dedicated MIDI interface. Don’t worry, it doesn’t necessarily cost very much: but I recommend avoiding the entry-level, a MIDI / USB cable like this one from ESI will do the job perfectly.
Virtual instruments
Then, once your digital piano is connected to your computer in one way or another, you can launch the virtual instrument via your DAW.
There are many options on the market. Generally, to really achieve quality sound, it’s better to turn to paid sound banks.

I particularly recommend the virtual pianos “Noire” (grand piano) and “The Gentleman” (upright piano) from Native Instruments, which are really excellent and that I use myself regularly.
With them, you can for example achieve sounds like this:
What if my digital piano doesn’t have MIDI outputs or a USB port?
If your keyboard doesn’t have connectivity to emit a MIDI signal and you also don’t have access to a real piano, then you will probably need to invest in what is called a master keyboard, which you will connect via USB to your computer that will emit a MIDI signal interpretable by the virtual instruments we just discussed.
► Click here to see my recommendations for MIDI master keyboards
In conclusion
There you go, you should now have all the information to get started with recording acoustic or digital piano.
If you have any questions left, feel free to ask them by leaving a comment below: I try to respond to everyone 🙂
► Continue reading: The equipment needed to set up a home studio.