The mixing of vocals is probably one of the most complicated aspects of audio mixing.
Simply because we are much more sensitive to the realism of a voice in a recording than to the realism of an electric guitar or a drum set.

When I started mixing my own tracks, I struggled to understand what to do and why. What processing to add, what setting to apply to a specific effect.
I added plugins following advice I had read or heard, but without understanding the impact it had on the mix.
All of this seemed quite mysterious, in fact…
…because I did not master the essential steps for mixing a voice.
Because indeed, while there are no rules for successfully mixing vocals, there are still a number of standard steps that are almost inevitable. And this, whether you are mixing on FL Studio, Cubase, or any other DAW.
So here is, through this article, a detailed and step-by-step overview of what to do when you start mixing a lead vocal track.
Step 1: Define a Target
The biggest mistake you could make regarding vocal mixing is to dive in without having defined a target sound.
I would even say, it’s to apply advice you’ve heard here and there, online or not, without considering their relevance to your mix.
“Compress with a ratio of 6:1 and an attack of 15 ms.”
“Add an equalizer and cut -5 dB with a bell filter at 1200 Hz”
…all this advice should be taken with a grain of salt because:
- they are only applicable to the track / to the mix of the person giving them since they depend 100% on the recorded sound signal;
- they will necessarily vary according to the musical genre: you will not compress a voice for jazz, pop, or hard rock in the same way.
This is why you will find almost no numbers, no “settings for mixing vocals well” on Projet Home Studio, but only guidelines.
But how to proceed then?
Well, the first thing to do before mixing a vocal track is to ask yourself what sound you want.
Are you looking for an aggressive, upfront sound?
Or conversely, something soft and airy, with lots of dynamic variations?
Would your track fare better with a very dry voice or on the contrary with something that has a lot of reverb?
Take the time to think about these types of questions to define your target vocal sound — if needed, find a reference track that resembles what you want to achieve.
This will allow you to mix your voice with a clear objective that corresponds to your track.
Step 2: Prepare Your Vocal Track Before Mixing
Generally, when thinking about mixing lead vocals, we immediately think about the plugins we will add.
This is normal: it’s the most fun part of mixing.
However, before starting to add any effects, it is really important to properly prepare your vocal track.
If we assume that the recording is of good quality, this “preparation” will translate into two main actions: comping and editing.
Comping
Generally, for the same vocal line, you will make several takes.
In the 60s, many tracks were done in “one take”, especially because recordings were made on magnetic tape.
Today, technology and the storage capabilities of our PCs allow us to easily make three or four takes for the same track.
Immediate consequence: for a given vocal line, you will be able to select the best passages and combine them.
For example, if the 1st phrase is better on take A than on take B, you will keep take A. And so on for each phrase, each verse… until you get a complete and perfect track!
Maybe you feel like this is a bit of cheating. Rest assured: this technique, called comping, is used by most professional studios.
Except in the case of the hit My Heart Will Go On, but not everyone is Céline Dion! 😉
So take the time to do several takes and compile them into a single track.
Tip: to help you select the parts of your piece, you can use a comp sheet like this one by noting the best passages:

Editing
Even on very good takes, there are always things you don’t want to keep, such as breathing noises or the headphone bleed into the microphone during quiet passages.
In a home studio context, depending on the conditions in which you record, it can be much worse:
- computer background noise;
- air conditioning background noise;
- a bird or a car outside;
- …
When the singer is singing, this type of noise is generally covered, so it doesn’t pose too much of a problem (but do turn off your air conditioning when recording…).
However, during the quiet passages between phrases or verses, it is essential to remove these anomalies, or they will stand out even more during mixing due to compression.

To do this, you simply need to:
- cut the parts you don’t want to keep using the appropriate tool in your DAW;
- then add quick fades at the beginning and end of each audio stem to prevent digital clicks from appearing.
In the end, you will have the cleanest vocal track possible, which will be easier to mix.
Step 3: Gain staging
Once your track has been properly edited, it’s generally the right time to adjust the level of phrases or syllables.
In other words, to do a sort of gain staging.
This step is super important because it will really make the difference between an amateur mix and a professional mix.
At least regarding the mixing of lead vocals.
Let’s imagine you have a vocal track with soft passages and loud passages:

If you leave the track like this and try to compress it, you will encounter the following issue:

- if you compress with a high threshold, only the loud passages will be affected;
- but if you lower the threshold to account for the low-level passages, the loud passages will be completely crushed by the compression because they will be well above the threshold.
On the other hand, by adjusting the level of the track phrase by phrase, verse by verse, or even syllable by syllable, you will avoid problems when adding effects and you can ensure that every word is intelligible in the mix.
It’s not always necessary to go down to the syllable level, but make sure that on average the phrases are at the right level.
For this, you can either use a simple gain plugin with an automation curve, or use an automatic gain adjustment plugin like Waves’ Vocal Rider.
Note that the latter can automatically generate an automation curve, which you can manually edit if needed to be a bit more precise.
Step 4: Subtractive Equalization
Most of the time, the first thing you will need to do when mixing a lead vocal is clean it up using equalization.
Or more precisely, correct the frequencies that don’t sound pleasant to you.
Typically, you will often find rumblings in the low frequencies, below 50-100 Hz, which correspond more to background noise (electrical, external…) than to the voice itself.
You can easily remove or attenuate all of this with high-pass filters (or low-shelf).
Next, you will need to correct the other frequency issues that you hear.
These can be related to all sorts of more or less controllable causes such as:
- the acoustics of the room where you are recording (without acoustic treatment, you may for example suffer from modal resonance effects);
- some frequencies that are a bit harsh on the ear related to the construction of the microphone and/or the quality of the preamp;
- some frequencies from the voice that stand out more with one microphone than another (this depends on the singers);
- the quality of the singer’s performance.

To correct these problems, the simplest way is to use the usual classic equalization technique:
- Identify the problem or element you want to correct
- Add a bell EQ filter with
- a relatively high Q factor (4 to 10)
- a high gain (+10 dB for example)
- Slowly sweep through the frequency spectrum with this filter until you hear the problem stand out strongly (in the form of resonance, for example)
- Reduce the signal (instead of +10dB) at the frequency band you are on by adjusting the Q factor as needed
I particularly emphasize the first point: take the time to listen to your track first to identify the elements that bother you. Indeed, while mixing vocals can be precise, it is unnecessary to correct tiny problems that are not audible in the overall mix but would be highlighted due to the +10 dB filter…
Once this step is completed, your EQ may look like this (but it could also look completely different, as it always depends on the source signal):

Note that we are indeed talking about equalization for a lead vocal. If, for example, you are mixing choirs, the equalization will likely be very different.
Step 5: De-Esser
Some letters or syllables tend to stand out aggressively in the highs once recorded by a microphone.
Typically, these are sounds like the consonant “S” but also “F”, “T”, or “CH”.
This is an audio phenomenon generally referred to as sibilance and can appear more or less strongly depending on the microphone and the shape of the singer’s mouth.
The fact that these sounds stand out can have a number of unpleasant consequences for your mix: on one hand, it can quickly become annoying for the listener, but it will also interfere with the reverb effects you will add later, which are very sensitive to these sounds.
Listen, for example, to the effect of the “S” on the texture of the reverb in this example:
It is therefore important to control this sibilance phenomenon as much as possible.
Sure, there are voice recording tips that can help minimize this, but often you will need to address the issue in the mixing.
Unfortunately, it is impossible to use a simple equalizer to cut the signal in the 4 or 5 kHz range: if you cut constantly, it will affect the entire track and the voice will sound strange.
The solution is to use what is called a de-esser like Fabfilter’s Pro-G (or one of these free alternatives):
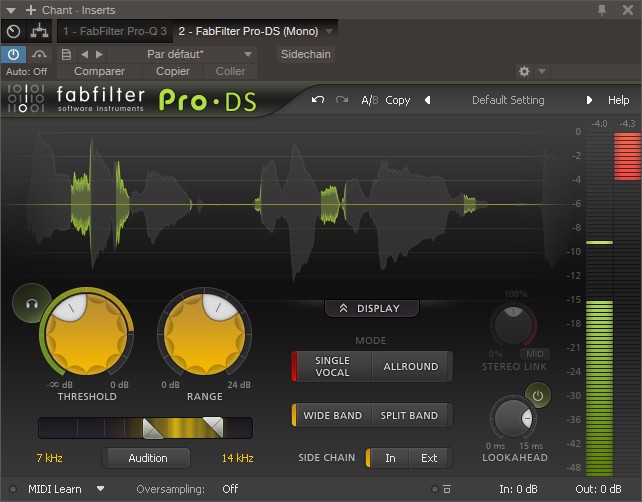
Through a multiband algorithm, this effect will allow you to control sibilance by attenuating only certain frequencies when
This brings me to a point of attention: while I don’t like to give overly precise rules, if you find that your equalization exceeds +5 or +6 dB, ask yourself the question “Does what I’m doing make sense?”.
While it can be easily understood with a drum, distorting a vocal track can happen very quickly — which is why it’s necessary to be cautious.
For example: rather than boosting the highs by +15 dB, maybe the overall mix is too loud in the highs? In that case, reduce the highs on other tracks instead of distorting the vocal track… 😉
Step 8: Saturation (optional)
This is completely optional, but it can sometimes be interesting to add harmonic saturation.
This can involve pushing saturation to the max to create a special effect like distortion, but by default I recommend sticking to more subtle saturation settings.
The idea is to enhance the harmonic content of the signal to make the sound a bit warmer, a bit more interesting, a bit more noticeable in the mix.
Note that this technique is not specific to vocal mixing: it can be applied to all kinds of instruments.

Of course, if the recording has already been done with a colored preamp (like Neve, for example), adding saturation again may not bring much — or even harm the quality of the mix.
On the other hand, if the preamp used is neutral (which is the case for most preamps integrated into audio interfaces) or tends to give a rather flat rendering, then it might be worth adding a bit of cosmetic saturation, using plugins that simulate tape, for example.
Some plugin recommendations:
- Kazrog True Iron;
- Waves J37 (-10% with this link and the code that appears);
- Soundtoys Radiator;
- or one of these free saturation plugins.
Step 9: Parallel Compression (optional)
Of course, all sorts of treatments can be applied to vocals.
The goal of this article is not to list the multitude of existing possibilities — otherwise, you would simply be lost among all this information (knowing that there is already a lot on this page 🙂 ).
However, one technique that is both very practical and commonly used is called “parallel compression” or “New York Compression”.
This method involves heavily compressing a track identical to the original vocal track and then subtly remixing it with the original signal.
This allows you to keep the peaks and some of the dynamics of the signal while supporting the quieter sounds from below, which makes it easier to highlight the voice in the mix compared to other instruments.
For more information, I invite you to check out my tutorial on parallel compression.
Step 10: Reverb and Delay
Finally, the last step often involves positioning the lead vocal in a stereo space, in three dimensions.
That is to say, adding reverb to your vocal track.
By default, I recommend doing this last to avoid the effect masking certain flaws or issues in your mix.
Finally, I mention reverb, but it is also possible to use other effects like delays.
Simply put, it depends on the styles of music and the density of the effect you are looking for.
Reverb
To make the voice less dry, adding a reverb plugin is often the simplest solution.
Indeed, this effect instantly makes a voice more interesting by giving it a stereo dimension.
The downside is that the more reverb you add to a voice, the more it will seem distant:
The duration of the reverb and its relative volume compared to the vocal track will therefore be two critical parameters that you must absolutely master:
- a reverb that is too long will drown the original signal and the lyrics will be less intelligible;
- a reverb that is too strong will give a sensation of distance from the sound source.
So, for certain modern music genres that require a very frontal voice in the mix, you may need to skip the reverb.
Next, the type of reverb will also influence its effectiveness within the mix.
Personally, I have a slight preference for plate reverbs (notably Abbey Road Reverb Plates by Waves: -10% with this link and the code displayed) as well as for certain algorithmic reverbs (like those from ValhallaDSP).
But you are free, of course, to experiment with all plugin outputs.
Delay
When a reverb is not suitable for giving dimension to a vocal track, it can be interesting to use a delay effect (or echo in French, it’s the same thing).
This may seem surprising, as delay is often perceived as a special effect, but it is actually a commonly used effect when mixing vocals.
More specifically, many engineers use a technique called slapback delay — very simple but extremely effective for giving depth to a voice.

Specifically, this involves using a delay plugin set up as follows:
- an extremely short echo time (50-100 ms on average);
- a single repetition (thus a feedback setting of 0%);
- mono only (the repetition of the signal in the left channel is identical to that in the right channel).
Of course, equalizing the echo effect is necessary to prevent it from overpowering the original track.
Check out this article for a bit more information on the subject.
Congratulations, you now know how to mix a voice!
First of all, congratulations on reaching the end of this long article! 🙂
You now know the steps to successfully mix a lead voice, regardless of the music style or recording (even if the quality of your mix will, of course, depend on the quality of the recording).
Now, the last step is simply to put it into practice: take an old mix, remove all effects from the vocal track, and start mixing it again following the steps in this article.
Then do the same with your next track.
Quickly, you will notice that your vocal tracks will be more impactful and will take up more space in the mix.
With that, see you soon for more articles on audio mixing 🙂