Contrary to what one might think, equalizing an electric guitar is not something extremely complex.
In any case, I find it less complicated than equalizing acoustic instruments — because we instinctively have a less precise idea of the sound of an electric guitar than, for example, a violin or a voice.
In other words, the range of possibilities regarding the sound of the electric guitar is really wide: one can imagine a warmer, sharper, darker, more vintage sound…
However, beyond mastering the fundamentals of equalization, it is still important to have a certain number of reference points regarding the frequency spectrum of the electric guitar and how it can be equalized.
It is indeed necessary to know where to look for the sound problems that we hear — especially since our recordings in a home studio context are not always perfect.
Therefore, I propose to give you as many tips as possible for equalizing the electric guitar through this article structured in three parts:
- a word on the philosophy of equalization;
- a detailed description of the frequencies to know, with a “cheat sheet” graphic that you can download;
- a selection of tips or techniques that will allow you to go further than just knowing the important frequency ranges for the electric guitar.

An Introductory Word on Electric Guitar Equalization
Before diving into the heart of the matter, there are two elements I would like to share with you, and understanding them is crucial for being able to work correctly with electric guitars.
Magic Doesn’t Exist
By clicking on this article, perhaps you were looking for the equalization settings to apply to your electric guitar tracks?
Maybe you were expecting advice like “Put a bell filter of +4 dB at 200 Hz for more warmth” or “Cut the highs at 8 kHz with a low-pass filter”.
We regularly see this kind of thing on the Internet — and it’s normal because instinctively we are looking for the “right settings” that will replace the “wrong settings” we might have made until now.
Unfortunately, it doesn’t work like that: there is no magic equalization setting to apply to your electric guitars to make them sound professional.
Indeed, it is important to keep in mind that everything depends on the recorded source signal.
Typically, you will not equalize a bright guitar like this:
or a dark guitar like this:
There is no miracle recipe that one could systematically apply to our guitar tracks.
So, out with the presets for electric guitar EQ.
However, it is possible to learn to recognize certain problems on specific frequency bands to correct them with an equalizer.
This is the approach we will follow in this article.
But My Guitar Sound is Already Great…?!
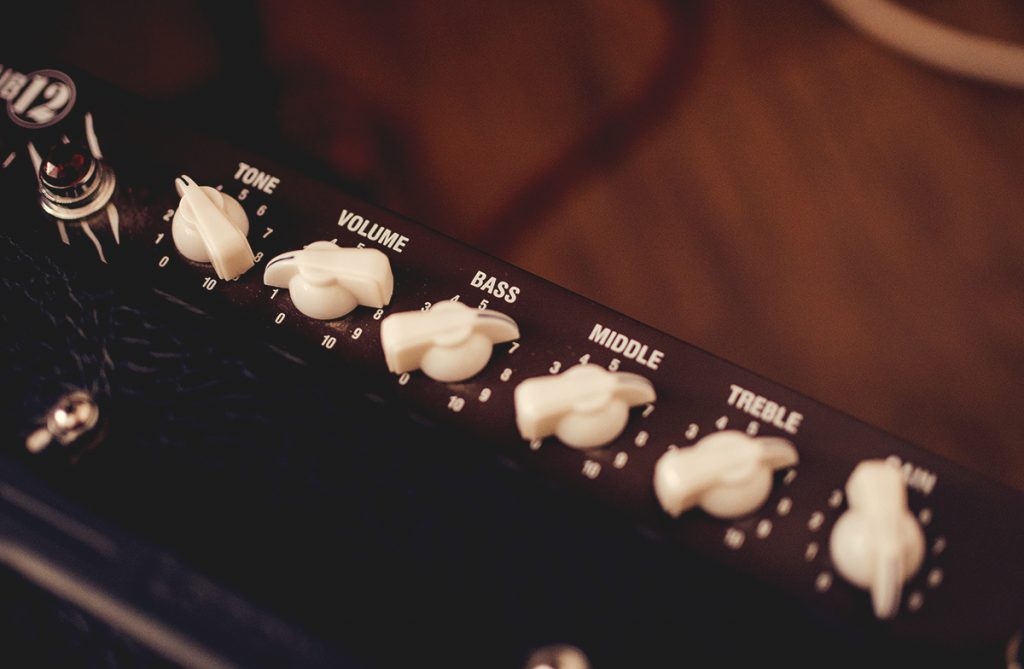
If you are a guitarist (like me), it’s very likely that you have already spent time refining your sound.
Maybe at the level of your amp settings, maybe through the choice of the microphone used to record your electric guitar, or perhaps through the addition of a number of colorful effect pedals.
(Yes, we all love buying effect pedals…)

Also, through this sound quest, you might think that your electric guitar sound is already perfect: you have already equalized it on your amp, the sound is heavy enough as you want if you use distortion, the highs are not too harsh…
…so why want to equalize the recordings again?
Well, for two main reasons:
First of all, the sound you captured is not necessarily perfect: there may be resonances related to the amp, related to the microphone used, or related to the room. Therefore, these issues need to be corrected.
But above all, your guitar recording that may sound very good when listened to alone must now be integrated with the rest of the mix.
So, with the other instruments: vocals, bass guitar, etc.
This is why it is essential to equalize your electric guitar recordings — but even more to equalize them in context, that is to say, while listening to the rest of the mix at the same time.
If you equalize your electric guitar in solo, it is indeed highly likely that it will not integrate well with the other instruments.
Frequency Bands to Know for Equalizing an Electric Guitar
Here are the frequency bands we will talk about today. You can download the diagram in printable PDF format by clicking here (feel free to share it around you of course 😉).
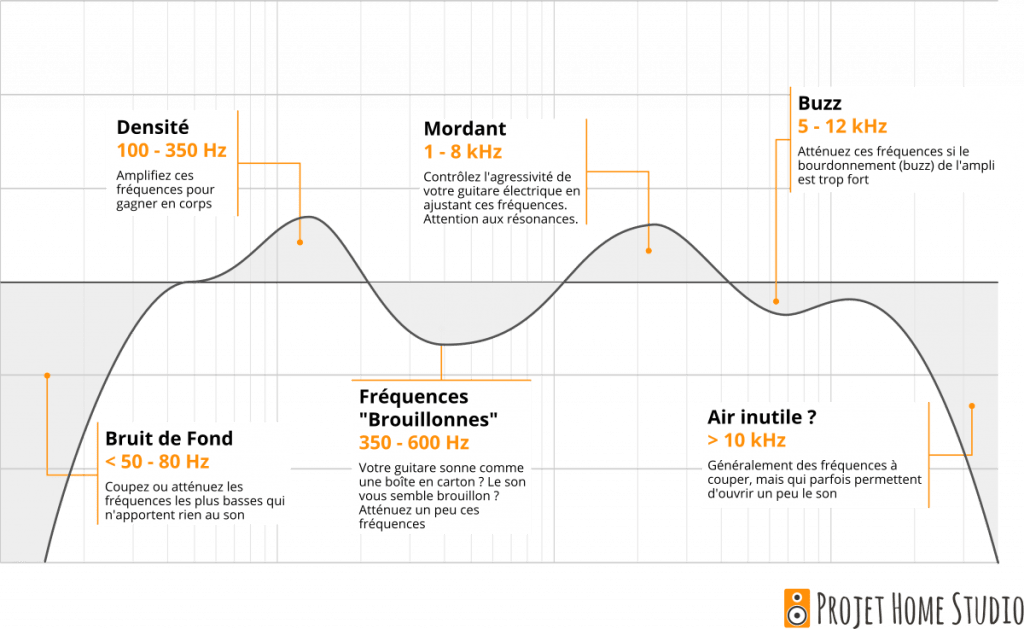
< 50 – 80 Hz: Background Noise
Most of the time, the low end of the frequency spectrum of your electric guitar recordings will contain what I call “background noise.”
This is simply a kind of rumble, typically located below 80 Hz, which may be related to:
- the solid-state resonances of the amp;
- interference from the electrical network;
- the sound of the amp itself or distortion pedals placed beforehand;
- street noise and passing cars (even though these are generally rarely a problem since the amp is much louder…).
In the end, it is often a bit of a combination of all these factors.
The fact is that these rumbles in the lows do not correspond to the sound we want to hear in our mix, and potentially reduce the available headroom.
In general, these are frequencies that we will attenuate or rather cut, for example with a high-pass filter set between 50 and 80 Hz (feel free to use a somewhat steep slope of 16 or 24 dB/octave).
Of course, the exact positioning of this filter will depend on the pitch of the notes played, and thus the tuning.
The higher you cut, the more you will impact the density of the instrument.
100 – 350 Hz: Density
Let’s talk about density, precisely.
Generally, in the frequency band ranging from 100 to 350 Hz, we find a sound energy that allows us to control the weight of the electric guitar in the mix.
Its warmth.
Its power.
If you feel that the instrument lacks body and density, if the guitar sounds too fragile, do not hesitate to boost these frequencies a bit.
On the contrary, if you hear resonances and an excess of energy in the lows, try to attenuate this frequency band a bit.
Be careful, however, to equalize while listening to the bass guitar at the same time: indeed, the 100 – 350 Hz range is typically an area where the bass conflicts with the guitar.
To avoid a messy frequency overlap, do not hesitate to cut your guitar higher than the 80 Hz we mentioned earlier.
Note: it is also in the upper bass and lower mids that we find the resonances/excess energy related to the famous palm mutes.
Generally, a simple equalizer will struggle to manage these situations. I recommend an alternative compression technique that I explain in this article on mixing hard rock/metal electric guitars.
350 – 600 Hz: “Messy” Frequencies
Still the most complicated area to manage.
For all instruments, by the way.
Indeed, this is a frequency band where you will again find part of the body of the electric guitar.
You can therefore amplify it a bit to gain power in the mids and achieve a slightly more rock sound.
Conversely, this means that if you attenuate it too much, your guitar will become fragile and shrill (“since only the highs will remain”).
However, be careful about two things:
- the accumulation of frequencies with other instruments: often, in mixes done in home studios, I notice an excess of energy in this frequency range with too many overlapping instruments.
- the messy side: these frequencies located between approximately 350 and 600 Hz tend to give a messy, “muddy” (muddy) feel, as our English-speaking friends say, which harms the overall clarity of the mix.
1 – 8 kHz: Bite
A bit easier to manage, the range from 1 to 8 kHz allows you to control the bite, aggressiveness, and sharpness of your electric guitar.
(By the way, don’t forget, these frequencies are just guidelines: it all depends on your base recording).
By boosting this frequency range, you will be able to make your guitar sound harder and stand out in the mix.
A small boost of a few dB with a bell filter will often be enough to make the sound much more upfront, “in your face”.
By focusing particularly on the area between 1 and 4 kHz, you can also bring out the pick noise.
However, be careful of potential conflicts with the vocals: this same frequency range is indeed crucial for the clarity of the singing and the intelligibility of the lyrics. So be cautious.
Note: especially when working with really saturated guitars, resonances can appear and harm the harmony of the recording.
Often, this type of resonance is found in the frequency range from 1 to 8 kHz.
So don’t hesitate to attenuate them (without necessarily cutting them too drastically) with a bell filter with a high Q factor.

5 – 12 kHz: Buzz
Starting from 5 kHz, we generally begin to encounter sounds that are a bit less interesting and a bit less musical.
Typically, between 5 and 12 kHz, we often find a bit of electric buzz generated by your amp and any distortion or saturation pedals you are using.
These can be frequencies that you will attenuate with a small EQ curve.
However, I do not recommend cutting them too aggressively: these frequencies contribute to the grain and aggressiveness of your electric guitar. If you cut them completely, your guitar will sound too dull.
>10 kHz: Unnecessary Air?
Frequencies above 10,000 Hz in your electric guitar recordings can contain a bit of presence or clarity.
If you feel that your recording lacks this, you can try to lift these highs a bit, for example with a high-shelf filter.
However, especially for heavily saturated guitars, we often find ourselves attenuating or cutting these frequencies with a low-pass filter, which generally has the effect of pushing the guitar a bit back in the mix.
Some tips for equalizing electric guitar
Of course, keeping in mind the frequency bands mentioned above is important.
But there are also a number of more general elements/tips that I want to give you to go a bit further.
Equalize at the recording
This is true for all instruments, but I find it even more true for electric guitars.
Many factors influence the texture and frequency response of these instruments.
It is therefore important, from the recording, to start under good conditions.
That is to say, to make all the necessary adjustments to avoid having to make complicated equalizations.
Start by changing the strings before recording. We don’t always notice it, but the difference between worn strings and new strings is truly remarkable: new ones are much brighter and provide a much more articulated sound (which will stand out better in the mix).
Of course, the choice of guitar or the pickups mounted on it will also influence your sound: for the same piece played under the same conditions, you will not equalize a Fender with ’60s Strat® (single coil) the same way as an Ibanez RG with Seymour Duncan Black Winter (humbuckers).
Similarly, the amp settings and microphone positioning will strongly affect the quality and character of your recording, which will necessarily influence the amount of equalization needed during mixing.
In short, try to achieve the sound that most closely resembles what you want to hear in the final piece from the very beginning.
► Feel free to check out some advice from my guide on recording electric guitar on this topic.
Group Equalization
We sometimes tend, especially when starting out, to want to equalize each guitar track individually.
This is not in itself an error or a bad approach, but it complicates the mixing process and multiplies the risks of errors / poor equalization choices.
By default, I recommend sending your guitar tracks to a bus (a group of tracks) and equalizing directly on that bus, for example by using a “console strip” type plugin, as shown in the photo below.

Cut Before Boosting
We sometimes have the reflex to boost certain frequencies that sound good first, rather than cutting those that are less harmonious.
This is not a recommended practice: on the contrary, it is more interesting to first address the problems (resonances, slightly harsh sounds…) with subtractive equalization.
Theoretically, once you have done this, you are left with only the pleasant parts of the sound — which you can then slightly boost if you wish with additive equalization.
In Conclusion
There you go, you now have a wealth of information to equalize your electric guitar tracks, regardless of the musical style.
► To continue reading on a related topic, I recommend checking out this detailed guide on equalizing acoustic guitars.