Audio compression is probably the most difficult effect to understand and master.
Isn’t it?
I must admit that it took me a long time to grasp how to use it. Equalization, reverbs, delays… those were manageable — but compression remained an obscure science for me.
Beyond understanding the effect itself and the usual settings of compression plugins, I particularly struggled to visualize why I needed it.
In fact, the problem is that a compressor can serve many purposes.
To simplify, it’s often said that it serves to reduce the dynamic range, that is, the gap between the soft and loud sounds of a recording.
Unfortunately (or perhaps fortunately), the reality is more complex.
So, I decided to share with you this list of 6 possible uses of compression in a mix. I hope it will help you better understand what you can do with a compressor during mixing or mastering.
1 – Attenuate Peaks
Typical settings: Fast attack, Medium release
A classic use of compression.
If the dynamic range of a recording is very wide, then the peaks are likely to stand out much more than the rest during mixing.
The result will be a sound with little body and volume, difficult to perceive in the mix.
This is typically what can happen with a snare drum. No matter how much you equalize it, if the transients (the peaks marking the stick’s attack) are much louder than the rest of the sound, then your snare will lack impact and weight.
On the other hand, by compressing this transient, the level of the initial peak will be reduced and thus closer to that of the tail. You will then hear the details of the body of the instrument better.

This kind of situation is where “1176” style compressors excel, of which there are emulations in plugin form. They are indeed famous for having a very fast attack (around 20 microseconds) that allows them to optimally control peaks/transients.
2 – Add Punch
Typical settings: Medium attack, Variable release
Sometimes, however, the opposite operation is necessary: the peaks are roughly at the same level as the rest of the sound of the instrument, and the recording lacks punch, energy, or even aggression.
The solution?
With a compressor, you will compress the sound just after the peaks. This means you will need to use a slower attack, so that the compression occurs once the transient has passed. This way, the sounds that are not peaks will be attenuated.
Then raise the track level with the Make-Up gain and voilà! You’ve gained power 🙂
A typical example is that of an acoustic guitar. If you want to hear the strumming or the attack of the pick on the strings more distinctly, then you will need to compress the sound between the peaks to make them stand out.
Use a sufficiently slow attack so that the peaks are not compressed, and a sufficiently fast release so that the compressor returns to zero before the next peak.
3 – Level an Recording
Typical settings: Medium attack, Medium release
A bit in line with the previous example, it is also possible with a compressor to level the sound of a recording.
In other words, we are not necessarily going to compress the transients but rather the body of the instrument or voice. The goal is to achieve a more homogeneous level, which stands out well in the mix.

This is typically the kind of situation where we will use the famous “LA-2A” type compressors (or their plugin emulations). Very simple to use because it is generally not possible to adjust the attack or release, they soften the sound and allow for a more constant level.
I particularly recommend trying this technique on recordings of bass guitar, piano, or vocals if you feel that your instrument appears and disappears in your mix.
4 – Adding Color
Usual settings: doesn’t matter

A large number of analog compressors are known to add color and character to the sound when processing an audio signal.
This phenomenon is simply due to the choice of components found inside (tubes, transistors, diodes…).
This is the case for the vintage models I mentioned earlier, such as the 1176 from UREI or the LA-2A from Teletronix.
Of course, to add warmth to your mixes, you can very well use a simple saturation plugin. However, some plugins dedicated to compression simulate with more or less fidelity vintage compressors and their characteristic coloration.
So, if you want to give character to your tracks or even a real vintage feeling, this is the kind of plugins you can turn to. Even if the effect may sometimes seem subtle, it will quickly make a difference if you use it on several tracks!
Tip: in many cases, it is not even necessary to activate compression to achieve coloration. Keep a unity ratio (1:1) and simply enjoy the analog simulation of your plugin 🙂
5 – Adding “Glue”
Usual settings: Low ratio (1.5:1 or 2:1), a few dB of gain reduction only
No matter how well you compress and mix your various tracks, you may sometimes feel that the whole lacks coherence.
As if the instruments were all playing in different places.
Perhaps the initial recording is to blame — in any case, compression can again help you in this situation.
More specifically, the bus compression.

The general idea is to apply light compression to a group of tracks. For example, a group of drum tracks (kick, snare, overheads…).
If you keep a low ratio and only 2 or 3 decibels of gain reduction, the sound of the different instruments will somehow become more cohesive, more consistent.
It is said that we add “glue”. Sound glue, in a way.
However, be careful, poor settings can quickly destabilize your mix, especially since all the instruments you have grouped in your bus will be affected. So be cautious and use this technique lightly…
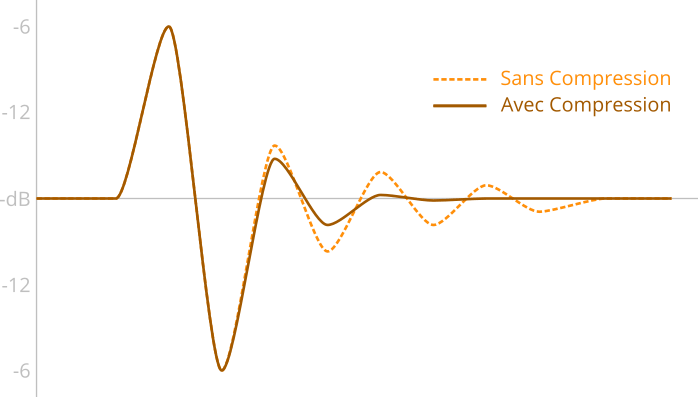
6 – And finally, Parallel Compression
Usual settings: Very low threshold, low ratio, parallel processing
Last point on this list, parallel compression. It’s a very handy technique but should not be used blindly on all your mixes.
The idea is to mix two signals:
- A “dry” signal, without compression
- A “wet” signal, identical but with additional compression
In image:

The goal is generally to maintain the dynamics of the recording (thus the peaks) thanks to the “dry” signal, but to subtly add the heavily compressed signal. Transients will therefore not be affected, but initially low-volume sounds will be more present.
This allows for a thicker, denser sound, without sacrificing the dynamics of the instrument or the mix. Don’t hesitate, by the way, to use a colored compressor like those mentioned earlier for a more interesting effect.
This technique is also called New York Compression. It is often used on drum buses but also during mastering.
For more information, feel free to check out my article dedicated to parallel compression.
In conclusion
As you can see, compressors can be used in many situations to achieve very different effects.
Of course, each mix has its specifics. Within the same album, it’s a bad idea to think “I absolutely need to compress my drums because I did it last time.” Instead, take the time to ask yourself what you can improve. For that, this list will surely give you some leads…
And you, which of these techniques were you already using? 🙂