A good snare drum sound is essential to the dynamics of a mix.
However, much like with the kick drum, equalizing this instrument is complex. It is very easy to destabilize your mix by amplifying the wrong frequencies.
With this little guide, you will learn how to effectively use an equalizer on a snare drum. In particular, you will know precisely the frequencies that generally cause problems and those that should be highlighted instead.
And above all, you will understand why they need to be corrected.
To do this, we will look at:
- the theory to apply;
- a concrete case illustrated with an audio example.
A little note: don’t forget that when mixing, there are no absolute rules. For example, if your snare drum already sounds good, it may not be necessary to apply all the adjustments I will suggest.

Clean Up Frequencies with EQ
The first thing to do will be a subtractive equalization. In other words, you will need to clean your snare drum track with an equalizer by attenuating (or cutting) certain frequencies.
Unwanted Low Frequencies
As often, it is useful to remove the sub-bass frequencies that add nothing to the sound. For this, I recommend placing a high-pass filter between 60 and 100 Hz.
Of course, it is up to you to find exactly from which frequency you can start filtering.
Be careful not to lose energy from your snare drum. The idea is just to remove the frequencies that pollute the lower end of the audio spectrum.
250-650 Hz: Boxy Sound and Resonances
This frequency range, quite broad, is probably the one that will give you the most trouble.
The first problem you will encounter here is what is called in English boxiness. That is to say, a cardboard box sound, which must absolutely be avoided.
The second problem is resonances. With snare drums, there are often frequencies that resonate quite metallically. They are an integral part of your instrument: that’s why many artists tune their snare drum to the key of the piece they are playing.
For example, here is an audio example where I isolated a frequency band centered around 370 Hz.
As you can hear, it lacks definition, and there are many resonances. Not at all the type of sound we want to hear!
Most of the time, you will need to clean this frequency band approximately located between 250 and 650 Hz.
To do this, I recommend acting in two steps:
- Attenuate the resonances and the boxy sound with a fairly wide bell filter.
- Search for and surgically remove the resonances and, if necessary, their harmonics using one or more bell filters with a very high Q factor (15 and above).
If needed, you can even use a spectrum analysis plugin like SPAN to identify the resonances:

Note: if your snare drum really lacks body, it is sometimes necessary to do the opposite, that is to say, boost a bit around 250-300 Hz.
Add Punch and Attack
Once your track is properly cleaned, you can highlight the frequency bands that you find pleasant…
…but only if necessary!
If your recording already has all the punch and snap you want, you can very well leave it as it is. 🙂
150-250 Hz: The Body of the Snare Drum
It is generally between 150 and 250 Hz that the energy, the body of the snare drum, is found.
It is therefore often interesting to accentuate this area with a fairly wide bell EQ, to add a bit of punch.
However, be careful that the frequencies you amplify are not the same as those you have highlighted on the kick drum. Otherwise, you risk losing energy and cohesion between the two!
1-4 kHz: the attack
If you want to add attack and snap to your snare drum, you will generally find the corresponding frequencies between 1 and 4 kHz.
However, I advise you to be quite cautious with your EQ. Indeed, in this part of the mix, there are often many things happening: guitars, vocals, bass guitar… It is therefore important to ensure that all instruments coexist properly.
Also, use a bell equalizer with a relatively narrow Q factor (1.5 to 3) to avoid impacting too many frequencies.

Even more texture…
Depending on the sound you want to achieve, it is possible to use your EQ to obtain more texture and presence.
To do this, you might add a few decibels to the frequencies between 5 and 10 kHz. They correspond to the sound of the timbre (the steel curtain located under the instrument).
If the sound then becomes too high or aggressive, do not hesitate to add a high-shelf filter around 10-15 kHz to better control it, or even a low-pass filter (but be cautious).
If you recorded your snare with two microphones — one above, one below — you can subtly mix the one from below to bring out the sound of the timbre.
Example of equalization settings
As usual, I have prepared a little audio example to put into practice the theory I just explained.
I used a simple snare sample (provided by Surfjira under CC-BY license) and looped it.
Here is the sound we will be working on, raw, without any equalization:
The recording is not horrible, but it is not perfect either.
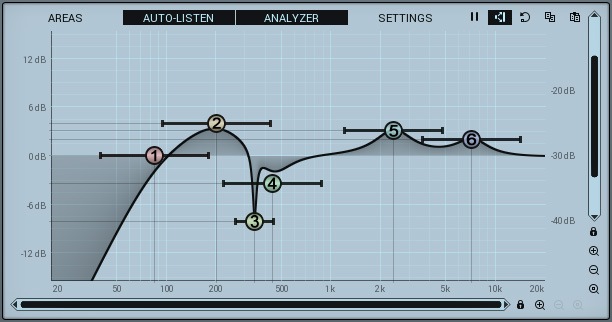
Step 1: Spectrum cleaning
I first sought to clean the sound by removing unnecessary or problematic frequencies.
In particular, I strongly attenuated the metallic resonance that was very present around 340 Hz with a very narrow bell EQ (Q factor of 15).

Here is the result after cleaning:
As you can hear, there are much fewer metallic sounds after this first equalization. The sound is cleaner.
Step 2: Enhancing punch and attack
I then decided to use my equalizer to boost the frequencies I liked, in order to give body as well as snap and presence to the snare drum.
The audio result:
Now, the sound is much punchier and more organic. If you listen again to the recording from the beginning, you will see that our snare drum is now significantly more effective and pleasant to hear.
To go further
That’s it, you are now ready to best equalize your snare drums! 🙂
To go further in drum mixing, feel free to check out, for example, my article on mixing cymbals, a subject much simpler than it seems…