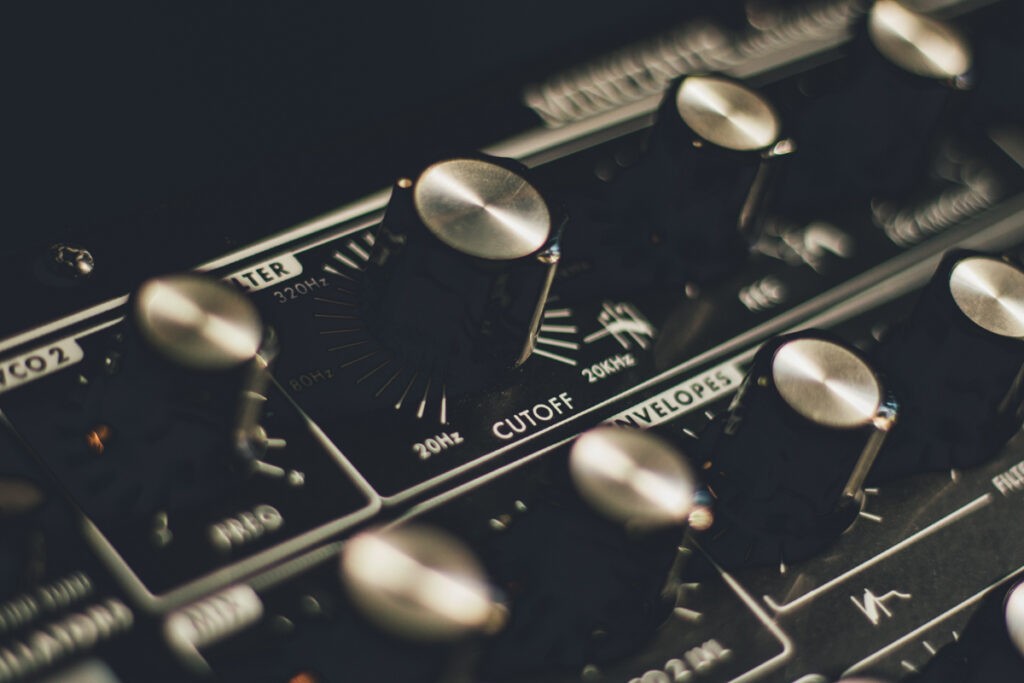
If you’ve ever played with a synthesizer — even for just a few minutes — you’ve surely turned that big knob often labeled “Cutoff” or “Filter” and heard the sound transform under your fingers.
That moment when the sound shifts from bright and sharp to warm and round, or vice versa… that’s the filter at work.
And the good news is that it’s far from complicated to understand. The filter — also known as VCF for Voltage Controlled Filter on analog synths — is one of the most important building blocks of sound synthesis, and its operation is actually quite intuitive once you lay the groundwork.
That’s precisely the purpose of this article: to understand what a filter is, how it works, and especially how to use it intentionally to give character and life to your sounds.
What is a Filter on a Synthesizer?
Let’s start from the beginning.
A filter, in the context of a synthesizer, is a module that will act on the frequency spectrum of a sound — in other words, on the highs, mids, and lows that make up that sound.
More precisely, a filter will allow certain frequencies to pass while attenuating or removing others.
That’s where the analogy comes from: just as a coffee filter allows liquid to pass while retaining the grounds, an audio filter allows certain frequencies to pass while blocking others.
(Yes, I know, it’s a great analogy 😅)
Concretely, take a synth sound rich in harmonics — a Saw wave for example, which sounds naturally bright and aggressive.
By default, the sound is a bit aggressive.
If you apply a filter that gradually attenuates the highs, the sound will lose its brightness and gain warmth and roundness. It will seem more closed, less upfront, and softer.
Turn the knob the other way, and the highs come back — the sound becomes sharp, present, aggressive again.
That’s fundamentally what a filter does.
But why is it so important in synthesis?
Well, because the oscillators of a synthesizer produce relatively simple and repetitive waveforms — triangle, saw, square… These waveforms certainly have character, but they are raw.
It’s the filter that sculpts this raw material, removing what doesn’t serve a purpose, highlighting what gives the sound its identity.
It’s actually rare to use a synthesizer without activating the filter — personally, I think it literally never happens to me!
Note also that on analog synths, the filter is often considered the centerpiece of the instrument — often more so than the oscillators themselves.
It gives the Minimoog its warm and legendary character.
It gives the famous Roland TB-303 its recognizable acidity, with that bouncy quality that stands out among thousands.
Each filter has its own personality, its own sound color, and musicians know and choose them for that.
Types of Filters: LPF, HPF, and BPF
There are several types of filters found on synthesizers. On all machines and plugins, you will find at least a low-pass filter.
It’s really the quintessential filter.
However, you will also regularly encounter high-pass filters and band-pass filters: so today we will focus on these three types of filters.
Low Pass Filter (LPF)
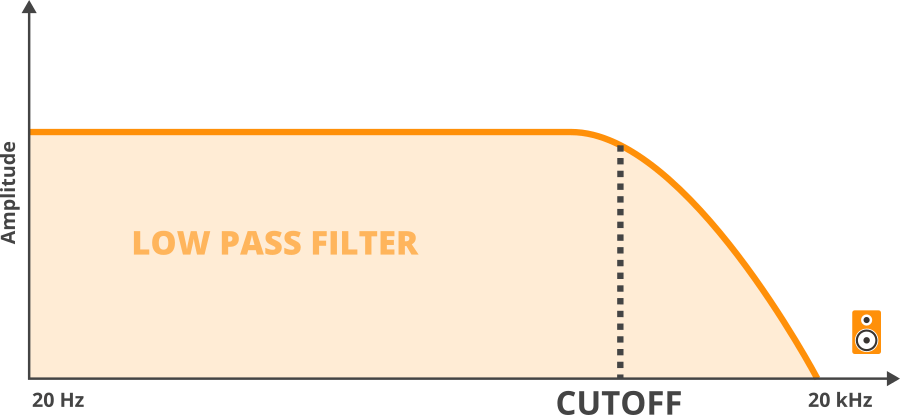
It is by far the most common. And the one you will encounter on almost all synthesizers.
Its principle is simple: it allows low frequencies to pass and attenuates high frequencies beyond a frequency that you define — the famous cutoff point.
Concretely, the more you close the low-pass filter (the lower you set the cutoff), the more the highs disappear and the sound becomes warm, round, and dark.
The more you open it, the more the highs return and the sound becomes bright and present.
This is the most classic use of the filter in synthesis: we start with a raw sound rich in harmonics, and we sculpt it by adjusting the opening of the low-pass filter.
The High Pass Filter (HPF)
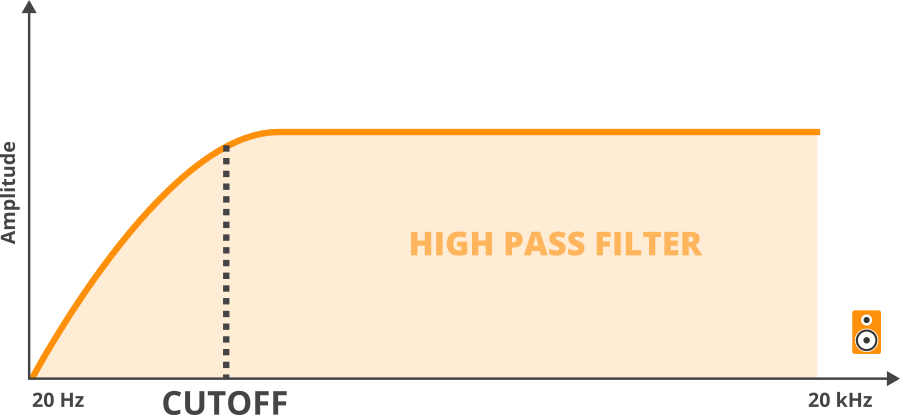
It is the exact opposite of the low-pass filter: it allows high frequencies to pass through and attenuates low frequencies below the cutoff.
Less spectacular at first glance than the LPF, it is nonetheless extremely useful. In music production, the high pass filter is often used to lighten a sound, removing low-end frequencies that would clutter the mix — exactly as we do in mixing with a high pass filter on a guitar track.
On a synthesizer, a well-tuned HPF can transform a pad that drowns the mix into something airy and light, just supporting the harmony without taking up all the space.
It can also create interesting effects on leads or textures by gradually removing the lows, giving a sense of distance or fragility to the sound, which can be very useful during transitions.
The Band Pass Filter (BPF)
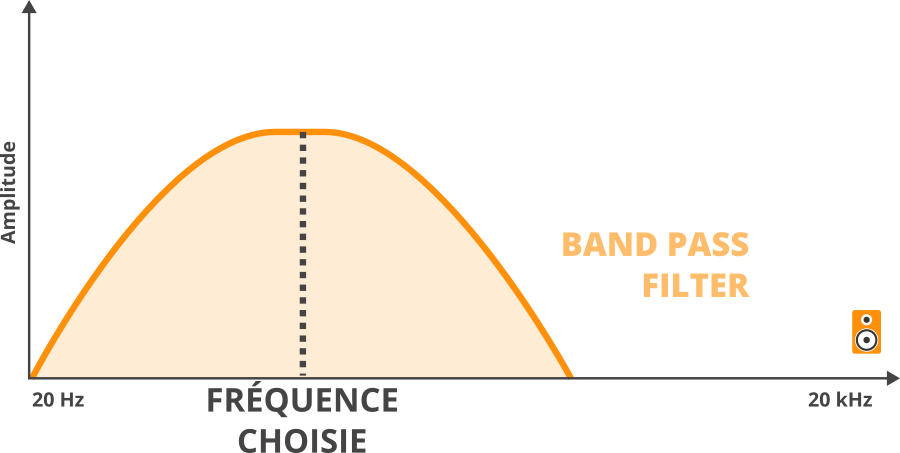
The band pass filter, on the other hand, only allows a band of frequencies around the selected frequency to pass through — and attenuates both the frequencies below and above this band.
The result is a sound that seems “focused” on a specific area of the spectrum, with a rather particular color: neither really bright nor really deep.
Often compared to the sound of a voice on the phone or an AM radio, the band pass filter has a very characteristic color.
In sound synthesis, it is used less frequently than the LPF on a daily basis, but I also find that its power is somewhat underestimated: to help sounds integrate into a mix, by controlling the amount of highs while avoiding the sound being too bass-heavy, it can be great.
Moreover, filtering the sound with a band pass filter, which in some ways combines a high pass filter and a low pass filter, can sometimes yield sounds that have a certain vocal quality, which can lead to interesting results depending on the style of music you are working in.
Filter Settings: What You Need to Know
So now, knowing the types of filters is good.
But to really know how to use your synthesizer, it is essential to understand the main settings that control the behavior of the filter.
These are the parameters you will manipulate every day, and mastering them will transform your way of designing your sounds.
The Cutoff: The Main Setting
The Cutoff — also called the cutoff frequency — is the central parameter of the filter. It defines the frequency at which the filter starts to act.
On a low-pass filter, for example, the Cutoff defines the frequency above which the highs will start to be attenuated.
Lowering the Cutoff means closing the filter: the sound becomes darker.
Raising the Cutoff means opening the filter: the sound becomes brighter.
Here is an audio example with a filter where we manipulate the cutoff:
In practice, it is often the first knob we turn when we want to modify the character of a sound on a synth.
And it is also one of the most expressive parameters to control in real-time, by hand or via modulation: it is indeed quite common to put an LFO on the Cutoff
(If you are not well-versed in the topic of LFOs, I invite you to check out this article)
One important thing to understand: the filter is not a door that opens or closes abruptly. It is a progressive attenuation, the slope of which is defined by what we call the “poles” of the filter (12 dB/octave, 24 dB/octave…).
The steeper the slope, the more pronounced and radical the cutoff is. That’s why 4-pole filters (24 dB/oct) like that of the Minimoog sound so sharp and characteristic.
Resonance
Resonance (often simply represented by the letter Q) is undoubtedly the most spectacular setting of the filter.
Specifically, resonance will amplify the frequencies located just around the Cutoff point. It creates a sort of peak in the spectrum, right at the cutoff frequency, which gives the sound an accentuated, nasal character, sometimes almost shrill.
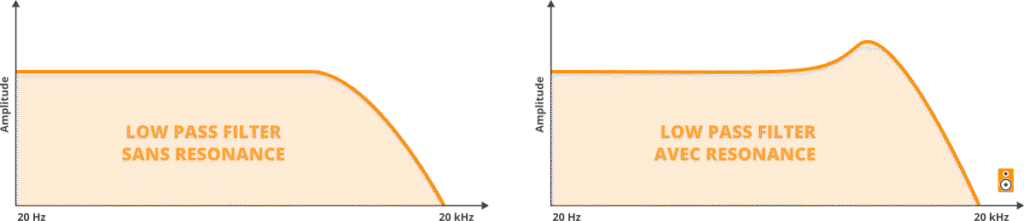
Here is an audio example where the Resonance setting of a filter (which is not fully open) is manipulated:
At moderate levels, resonance gives a sharper, more cutting sound, the character of which will depend greatly on how the filter is designed.
Pushed to its maximum, resonance can cause the filter to enter into self-oscillation: the filter starts to sound by itself, producing a pure sine wave at the Cutoff frequency, sometimes even without an input signal. This is a characteristic behavior of analog filters, and some musicians deliberately use it as a standalone sound source.
That said, be careful: resonance is a setting to be handled with care. A little resonance can add a lot of character, but too much resonance can quickly make a sound tiring and difficult to integrate into a mix.
Note: In some cases, increasing the resonance can lead to a decrease in the level of certain frequencies. Typically on classic Moog filters, the more you increase the resonance, the more the bass quantity decreases.
Key Tracking
Key Tracking — sometimes called keyboard tracking or key follow — is a somewhat lesser-known setting because it is not always immediately accessible, but it has considerable importance for the sound consistency of an instrument.
Imagine you set your low-pass filter with a well-defined Cutoff.
You play a low note: the sound is well sculpted, the highs are well controlled, it’s perfect.
You now play a high note — but the filter does not move: it is still set to the same cutoff frequency.
Consequence: the high note will sound much darker and closed than the low note, because its harmonics — naturally higher in the spectrum — will be more cut off by the filter.
In other words: the sound will be as you want it in the lows, but not in the highs.
This is exactly the problem that Key Tracking corrects.
Specifically, this setting ensures that the Cutoff of the filter automatically rises when you play high notes — and falls when you play low notes — in order to maintain tonal consistency across the entire keyboard range.
Sometimes Key Tracking is adjustable, in the form of a percentage ranging from 0 to 100%.
At 100% Key Tracking, the Cutoff follows exactly the same progression as the notes on the keyboard.
At lower values, the effect is more subtle — you can thus create sounds that naturally darken in the highs, which is generally the most musical to my taste.
Here are two audio examples, one without key tracking and the other with key tracking at 100%:
However, sometimes Key Tracking is simply an option, in
There is something extremely expressive and organic about controlling the filter opening yourself while playing — gradually increasing the Cutoff on a drop, abruptly closing the filter when a note hits, letting the sound breathe at its own pace…
No LFO, no envelope can reproduce that exactly.
Because it’s human, imperfect, alive.
That’s why on some synths, the Cutoff knob is deliberately larger than the others.
On the Moog Minitaur, for example, this big knob prominently placed is not there by chance: it’s an invitation to play with it, to use it as a standalone instrument.
So don’t hesitate, when you record, to control this type of settings manually.
The Envelope: Sculpting the Sound Note by Note
The second way to modulate the filter is to use an envelope — and it’s one of the most commonly used techniques in sound synthesis.
The principle is simple: instead of leaving the Cutoff fixed, we apply an ADSR envelope that will automatically evolve it each time a note is played.
In practice, as soon as you press a key, the envelope triggers and varies the Cutoff according to the path you have defined — attack, decay, sustain, release.
Why is this interesting?
Well, because it allows each note to have its own temporal evolution in a completely automatic way.
The possibilities are immense.
First Example — The Pad that Opens Slowly:
Let’s take a pad (a layer) like this:
As it stands, it’s a bit flat.
However, if we modulate the filter’s cutoff frequency with an envelope that has a long attack, we get something much more interesting: the note starts with the Cutoff almost closed — the sound is dark, muffled — then the filter gradually opens over the seconds, letting in the harmonics one after the other. The pad gradually gains in size, and this effect is enhanced by the reverb:
Second Example — The Short Envelope, The Acid Effect:
Now, in another context, let’s take this very simple bass line:
For now, it’s not super exciting.
But if we modulate the filter with a short envelope, particularly at the Attack and Decay levels, what happens?
Well, the filter opens very quickly and then closes almost instantly:
Add a bit of resonance, and you get a characteristic snap, reminiscent of Acid music:
Note: The amount of modulation, that is to say, the intensity of the filter opening triggered by the envelope, is generally controlled by a dedicated parameter called Filter Envelope Amount or Env Mod depending on the synths.
Feel free to manipulate this parameter manually (or by modulating it with another modulation source…) while playing.
The LFO: Continuously Animate the Filter
The third option, we’ve already talked a little about it in the article dedicated to LFOs — but it deserves to be revisited in this article for the sake of completeness.
In practice, it involves modulating the cutoff of a filter with an LFO, to cyclically and continuously evolve the cutoff frequency, generally independently of the notes played.
Standard Use
The classic use of this modulation consists of controlling the cutoff of a low-pass filter with a sine wave LFO.
The sound opens and closes gently, as if it is breathing. It’s soft, it can be hypnotic, and it’s very effective on pads; when synchronized to the tempo, it creates a modulation that naturally fits into the groove of the track.
Sound Design Usage
However, you can certainly imagine more extreme modulations.
A technique that I personally like to use a lot involves significantly increasing the speed of the LFO (the Rate) until reaching frequencies that are almost audible.
At this stage, something interesting happens: the filter starts to modulate so quickly that you no longer perceive a cyclical movement, but a texture, almost a noise, a granularity that overlays the original sound.
This is a truly fascinating territory of sound design — and often very surprising for those discovering it for the first time.
What you hear is no longer really a filter effect in the classical sense: it is a new sound color, achieved simply by pushing an LFO to its limits.
Here is an audio example (the intensity of the modulation increases over time):
Conclusion
There you go, you now know what a filter is, how it works, what its types and main settings are, and how to modulate it to bring your sounds to life.
What you need to remember is that the filter is not just a simple correction tool — it is a fully-fledged instrument of expression.
Whether you turn it by hand, envelop it note by note, or modulate it with an LFO, each approach opens up different and complementary sound possibilities.
The best thing you can do now is simply to practice. Take a synth — hardware or plugin — and spend time playing with the filter alone, listening to the impact of each setting, testing combinations. That’s how you really integrate these concepts! 😊
If you want to delve deeper into your understanding of sound synthesis, feel free to explore my other articles on the subject — I cover LFOs, envelopes, oscillators, and many other essential building blocks.
👉 You can find all that here.